-->

Welcome to our Coding with python Page!!! hier you find various code with PHP, Python, AI, Cyber, etc ... Electricity, Energy, Nuclear Power

Showing posts with label node. Show all posts

Wednesday, 3 May 2023

How to update Node.js and NPM to next version ?

Node.js is a cross-platform JavaScript environment that can be used for server-side scripting. Due to its non-blocking workflow, Node.js is popular among the web developers for building a dynamic web application. Node Package Manager also known as npm is the package manager for Node.js. It also serves as a command-line utility for interacting with the npm online repository for package installation, version management, and dependency management. It is important to have Node.js installed in order to use npm. Also, working with updated versions of Node.js and npm ensures better performance and added features.Stable version of Node.js can be downloaded or updated from the official Node.js website as well as through the command line using Node Version Manager(nvm). nvm was originally developed for Linux systems, however nvm can be installed separately for Windows system by the following steps:

  1. Go to this site: https://github.com/coreybutler/nvm-windows/releases
  2. Install and unzip the nvm-setup.zip file
  3. From cmd type nvm -v to ensure nvm is installed.

After installing nvm, the following can be done to update Node.js to the latest version:

nvm install <version>

Check the list of available Node.js version in the system using the following command:

nvm list 

To use the desired version, use the following command:

nvm use <version>


Update npm: To update NPM, use the following command:

npm install -g npm

Output:


Below is a demonstration for updating Node.js and npm versions for Linux systemsInstall nvm in Linux:

# curl -o- https://raw.githubusercontent.com/nvm-sh/nvm/v0.34.0/install.sh | bash OR # wget -qO- https://raw.githubusercontent.com/nvm-sh/nvm/v0.34.0/install.sh | bash

Check if nvm is installed successfully

Open a new terminal
nvm -v

To install latest version of node, use the following command.

# nvm install node
or
# nvm install --lts
or
# nvm install 
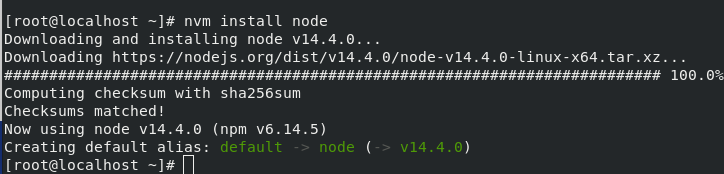
  

Check all the available version of node on the system:

# nvm ls


Use a particular version

# nvm use 
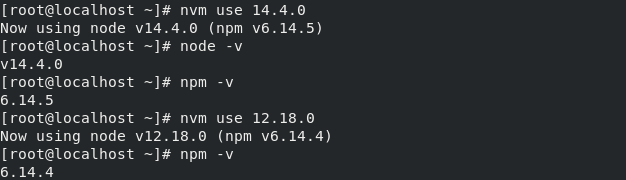
 

Update npm to latest version:

# npm install -g npm 


JavaScript is best known for web page development but it is also used in a variety of non-browser environments. 

Tuesday, 2 May 2023

How to install Node.js

To install Node.js on your computer, follow these steps:

Step 1: Go to the Node.js website

Step 2: Download the installer

  • On the Node.js website, click on the "Download" button.
  • This will take you to the downloads page where you can choose the appropriate installer for your operating system.
  • Select the installer for your operating system (e.g., Windows, macOS, Linux).

Step 3: Run the installer

  • Once the installer has downloaded, double-click on it to run it.
  • Follow the instructions in the installer to complete the installation.
  • The installer will install Node.js and the Node Package Manager (npm) on your computer.

Step 4: Verify the installation

  • After the installation is complete, open a command prompt or terminal window.
  • Type node -v and hit enter to check the version of Node.js installed.
  • Type npm -v and hit enter to check the version of npm installed.
  • If the versions are displayed, then Node.js and npm have been installed successfully.

That's it! You have now installed Node.js on your computer. You can now start using Node.js to build applications and install packages using npm.

installernodedownloadjscomputerinstallationlinuxwebsitedownloadsstep

Thursday, 5 November 2020

Password Hashing with bcrypt (easiest explanation)

#node #javascript #react #angular #AI, #Analytics, #BigData, #CloudComputing, #DataScience, #DataScientist, #IoT, #Java, #JavaScript, #Linux, #MachineLearning, #Programming, #Python, #ReactJS, #RStats, #Serverless, #TensorFlow

We use bcrypt to hash our passwords. But how to use it? We generally do 2 basic things with bcrypt.

  • hash a password (I mean, when signing up, we hash the password input and then save this hashed password instead of the plain password on our database)

  • verify password (I mean, when logging in, compare the plain password input with the hashed password that we saved)

The SIMPLEST WAY TO USE BCRYPT

  • Hash a password
//it creates the hashed password. Save this hashedPassword on your DB
const hashedPassword = bcrypt.hashSync(yourPasswordFromSignupForm, bcrypt.genSaltSync());
Enter fullscreen mode Exit fullscreen mode

now save this hashedPassword on your Database.

  • Verify Password
const doesPasswordMatch = bcrypt.compareSync(yourPasswordFromLoginForm, yourHashedPassword)
Enter fullscreen mode Exit fullscreen mode

doesPasswordMatch is a bolean. If the passwords match, it'll be true, else false.

COMPLETE GUIDE FOR USING BCRYPT

First, type this on your terminal to install the bcryptjs package
npm install bcryptjs

Now we are ready to use it.

Step 0.

Create your user model. In this case we are going to keep it simple. our model will only have email and password fields.

Step 1 (USING BCRYPT TO SAVE HASHED PASSWORD ON DB FOR SIGN UP).

const router = require('express').Router();
const User = require('YOUR_USER_MODEL');


const bcrypt = require('bcryptjs')


router.post('/signup', async (req, res)=>{
  // these emailFromSignupForm and passwordFromSignupForm are coming from your frontend
  const { emailFromSignupForm, passwordFromSignupForm } = req.body;

 //creating a new user on our database
  const newUser = await User.create({
  email: emailFromSignupForm,
  hashedPassword: bcrypt.hashSync(passwordFromSignupForm, bcrypt.genSaltSync()),
});

//sending back the newUser to the frontEND
res.json(newUser);


})


module.exports = router;
Enter fullscreen mode Exit fullscreen mode

This is a demo code of how to use bcrypt to hash the password and save the hashed password.

Step 2 (USING BCRYPT TO COMPARE PASSWORDS FOR LOG IN).

const router = require('express').Router();
const User = require('YOUR_USER_MODEL');


const bcrypt = require('bcryptjs')


router.post('/login', async (req, res)=>{
  // these emailFromLoginForm and passwordFromLoginForm are coming from your frontend
  const { emailFromLoginpForm, passwordFromLoginForm } = req.body;

  //find a user from the database with your emailFromLoginForm
 const existingUser = await User.findOne({ email: emailFromLoginForm });

//if no user found
if(!existingUser) return res.json({ msg: `No account with this email found` })

//if the user is found, I mean if the user is on our database, compare the passwordFromLoginForm with the hashedPassword on our database to see if the passwords match (bcrypt will do this for us)
const doesPasswordMatch = bcrypt.compareSync(passwordFromLoginForm, existingUser.hashedPassword); //it wii give you a boolean, so the value of doesPasswordMatch will be a boolean

//if the passwords do not match
if(!doesPasswordMatch) return res.json({ msg: `Passwords did not match` });

//if the passwords match, send back the existingUser to the frontEND
res.json(existingUser);
}


})


module.exports = router;
Enter fullscreen mode Exit fullscreen mode

This is a demo code of how to use bcrypt to compare and verify passwordFromYourLoginForm with the hashedPassword saved on your Database.

This is ONLY a demo of how to use bcrypt. Hope it helps.

If you have any Questions or If you are stuck

Feel free to reach out to me. 

I'd LOVE to be your friend, feel FREE to reach out to me!!


If this blog was helpful to you,

PLEASE give a LIKE and share,

it'd mean a lot to me. Thanks

Rank

seo