It’s never been easier to create a website than it is now. There’s an incredibly wide variety of free tools, affordable premium ones, competitive hosting and overall easy to use software to get a site up and running in less than an hour.
On the flipside, this means that more sites are springing up than ever. For this reason, knowing the basics on how make a proper website from scratch is more important than ever.
Find the right webhost and domain registrar
Web hosts are companies that provide technology and storage for your website. Essentially, they “host” your files and website domain on their servers, which they then display to visitors on your website.
The online hosting industry is huge and has both big and small players so there is no shortage to choose from.
However, there are a few things you should look out for when picking a webhost.
- Bandwith and processing resources they provide.
- How much storage space you have.
- Overall reputation.
- How quickly they respond to customer complaints.
- Price
Good processing resources and storage are the most important aspects to take into consideration, since they can speed up your site considerably.
A slow website is bad for business because visitors can get frustrated and press the “Back” button before the page loads. This in turn impacts your SEO, meaning your site won’t rank as well on search results. In practical terms, a slow site decreases your visitors, sales and email subscribers.
Another important criterion is how quickly they respond to customer complaints. In the unfortunate event of a hack or technical downtime, you really want your hosting provider to be quick and get your site up and running as soon as possible.
When it comes to price, we strongly suggest not to be tempted by “free hosting providers”. They have to earn money somehow, so they most likely cut corners, severely limit your resources or worse: they sell your information or feed you ads.
Hosting with SiteGround
Out of the many webhosts out there, SiteGround is one of the best (
if not the best). Both in terms of features they offer as well as trust and reliability. As a testament to their quality,
WordPress has endorsed them as one of the three trusted web hosts they recommend.
Here’s what makes SiteGround a good choice for someone who sets out to make a website from scratch:
- Excellent 24/7 customer support.
- A malware scanner for your website.
- Free SSL certificates for your website. (important for better rankings)
- One of the fastest webhosts out there.
Our personal recommendation is to go for the GrowBig plan, even if it’s on the pricier side compared to the StartUp plan, since it offers you some really awesome benefits:
- Host unlimited websites.
- 20GB storage space.
- Website backup and restore tool.
You can’t go wrong however, regardless of the plan you choose.
Adding a domain name
An internet domain is essentially the name of your website. In our case it’s “extendthemes.com”.
Registering a domain name is a distinct process from acquiring a hosting provider. However, most web hosting companies also offer to register your domain name for you once you acquire hosting.
Once you’ve decided on SiteGround, or another hosting provider, the next step is to connect a domain name to the host’s servers. This can be done in two ways, depending on whether or not you’ve already registered your domain name.
You don’t have a domain name
If you haven’t yet registered a domain name, you can do so directly from SiteGround once you’ve pressed on the order button.
Website names are important, both for branding and SEO purposes, so you should put some thought into it and scour the web for a name that is both expressive and available.
Here are just a few things you should consider:
- Do you want the keyword into your business name? For instance, an interesting name for a toyshop might be cooltoys.com. This helps makes your business more easily searchable.
- Length matters. Try to keep it short, if possible under 10 characters. This makes it easier for people to remember and manually type in your website.
- If the name is composed of words, try to use no more than 2.
- Use the right extensions. As a rule of thumb, pick .com or .net if you want to target users across the globe. If visitors target a certain country, choose extensions such as .fr, .de or .co.uk.
Of course, these are just guidelines, and not hard and fast rules. With persistence and a stroke of luck, every site can become successful so don’t obsess over this too much.
You have a registered domain
If you do already have a domain registered, then you will have to change your name servers so they point towards SiteGround. Don’t worry though, there is no “penalty” for doing this.
For instance, you won’t lose anything if you register a domain at GoDaddy and then host it with SiteGround. Millions of websites do this, without any negative effects.
The exact steps you should follow to change nameservers are different from one domain name registrar to another, but in most cases all you need to do is to just copy/paste a few lines from SiteGround’s settings section into the name server section of your registrar.
First, you need to log in to your SiteGround account, go to the My Accounts tab -> Information & Settings. You will find your name servers at the Account DNS section.
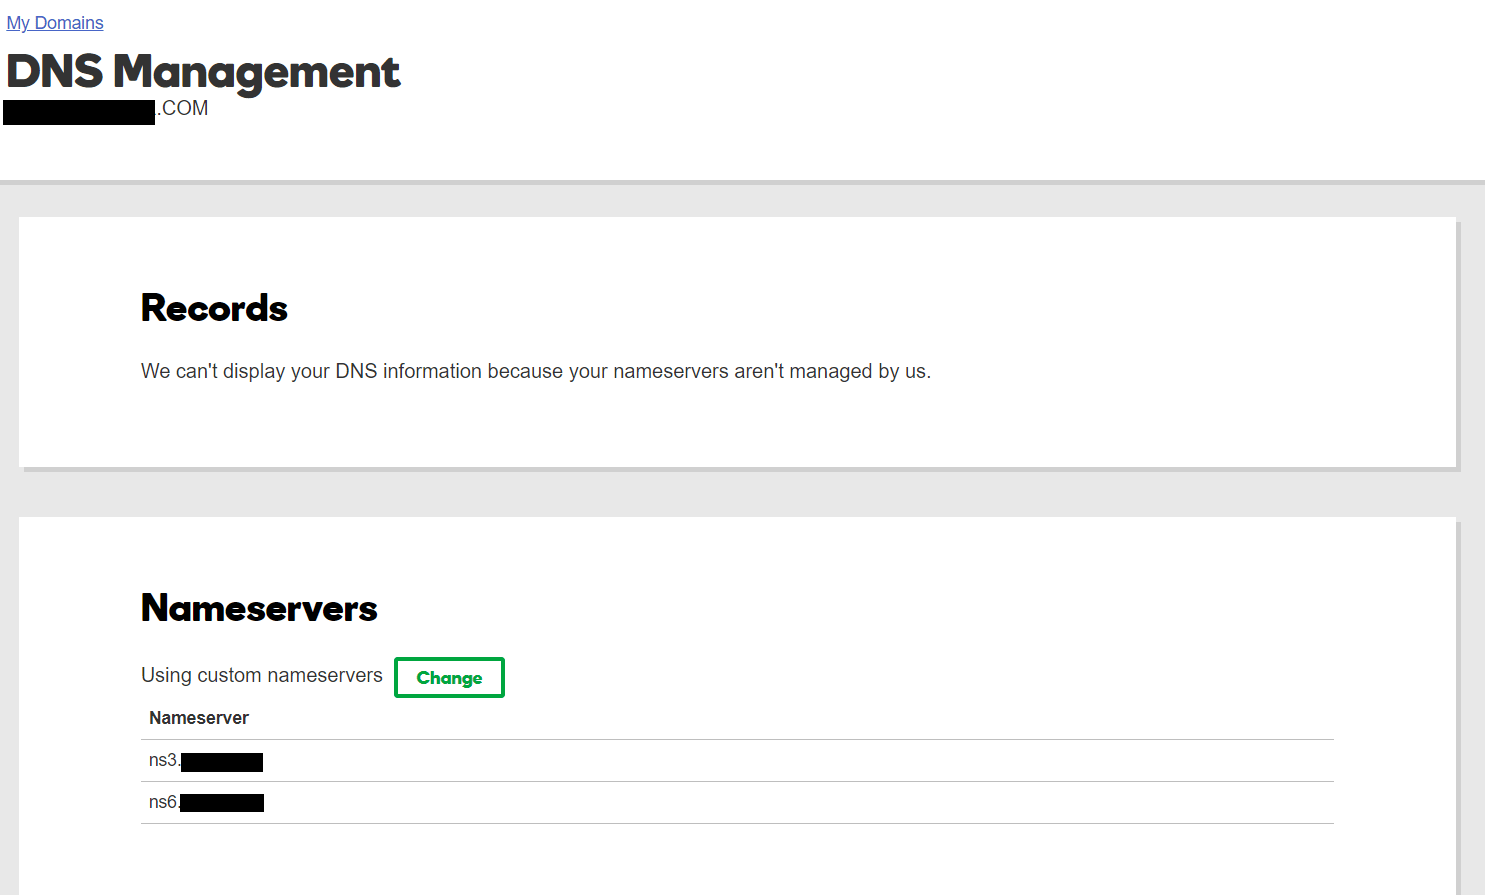
Once you know your SiteGround name servers, enter your GoDaddy account and look for “My Products” or “My Domains” sections. The two sections look different, but both will contain your basic website info.
Next, find the “DNS” or “Manage DNS” button. Pressing it will take you to the DNS management menu of your respective site.
Next, under the “Nameservers” section, press the green “Change” button to edit your name servers, and put in the ones from SiteGround.
All you have to do is just copy/paste the nameserver addresses from SiteGround into GoDaddy.
That’s it! At this point, it takes 1-2 days in order for the changes to take effect. This is because name servers have to undergo a process called “propagation” during which the information for your website is updated across the entire Internet.
After propagation is complete, your site is ready to go and you can begin to create the actual website users will interact with.
Choosing a Content Management System
Content Management Systems, or CMS for short, is special software that allows you to create the actual website users interact with. This can be blog posts, photo galleries, eCommerce product listings etc.
There are quite a few such CMS available to a regular user, but in this guide we’ll focus on one in particular: WordPress.
WordPress is the most popular such CMS, with around 55% market share. It’s a very flexible platform which you can use to build just about any kind of site that you want.
The best thing is, users who don’t know how to code can easily set up a beautiful website in just a couple of minutes, by pressing just a few buttons. And thanks to the thousands of themes and plugins available, you can customize your website anyway you want.
Of course, there are a whole bunch of other CMS systems you can use. But most of them come with a series of drawbacks that WordPress either doesn’t have, or can be compensated quickly with a plugin.
Installing WordPress on SiteGround
SiteGround has a very simple installation process for WordPress.
Log in to your SG account, then go to My Accounts and press the Go to cPanel button.
You are now in cPanel, which is the back-end admin console for your website, where you have access to all the features SiteGround can provide.
While cPanel can seem intimidating at first, most website owners rarely need to visit it again past the initial setup. In our case, that means installing WordPress.
To proceed with the installation, press the WordPress button in the Autoinstallers section.
Next up, press “Install Now”, which will take you to a menu where you need to do the finishing touches before completing the installation.
How to manually install WordPress if you’ve chosen another host
If you’ve chosen another host that doesn’t have the quick installation process, then you will have to set up WordPress on your site manually.
Setting up a WordPress website
Congratulations, you’re now on WordPress and can build up your blog, eCommerce shop or any other type of site that you need.
Below is a quick overview of the main tabs on WordPress and what they do. If you want to, skip this step and go directly to the next section on how to install a theme.
Navigating the side menu
Posts are the blog articles of your website. They are different from the Pages section since they are mostly focused around writing articles, whereas Pages are mostly navigational aspects of a website.
Media is where you can access any images, videos and other files you have uploaded into the WordPress admin area. This section groups together both published and unpublished files.
Pages are the organizational elements of a website, such as the “About”, “Contact”, “Disclaimer” pages.
Comments section is where outside visitors leave a reply or give feedback to your pages or blog posts. Unfortunately, most of the comments you will receive will be spam that promises random stuff such as immortality, free money etc.
Appearance is where you actually design and create your website, while also offering access to some of the actual code behind your website (if you so choose to tinker with it).
Plugins section is one of the reasons why WordPress is such a great CMS. In here, you can find software that adds extra functionality to your website, such as contact forms, pop-ups, video players, Google Analytics integrations, cache cleaners and a whole bunch of other features. Because WordPress is so widespread, you can find a plugin for just about anything you want.
Users is where you can see who has admin rights to your WP dashboard, and modify them accordingly.
Tools and Settings allows you to configure aspects of your WP site, such as cache, link structure, redirects, etc.
Choosing a WordPress theme
Themes are essentially predesigned “sites” that you load up into the admin area so users can actually do something once they visit your page.
WordPress has a huge number of free themes available for download and makes it super easy to install one.
First, go to the Appearance section, hover your mouse over it, and press the “Themes” button.
This will take you to a screen that lists all of the themes you have installed on your WordPress website.
WP itself comes with some themes preinstalled. These are fairly functional, good even. But you might want something more specific and with a different look and feel.
Fortunately, there are thousands of themes to choose from, all with their own distinctive designs, catered to the most niche website users.
To start browsing for themes, simply press the Add New button next to the Themes section headline.
This will take you to a separate menu, where you can browse all of the themes available on WordPress.org.
If you want to try out a particular theme, all you have to do is hover your mouse over it and press the Preview button. This will take you to a separate window where you can play around with the theme and see how your website would look like.
If you found a theme you would like to use, simply press the “Install” button, followed by “Activate” if you wish to make it the face of your website.
That’s it! You have now installed a theme on your website, and have started the foray into the online world.
However, there is a chance the vision you have for your website is so niche, no predesigned theme can properly do it justice.
In this case, you might want to try something else: site builder themes.
Build a website with a what-you-see-is-what-you-get WP theme
Some themes, such as Mesmerize FREE, give you a lot more freedom to build a website by providing you with many design elements, which you then use like LEGO’s to design the website you want from scratch.
With site builder themes, you don’t have to worry about some other website that uses the same theme as you and looks like a clone, since you can just design it to be completely unique.
On the flipside, you can also use the flexibility of site builder themes to model your website on some other page that you find attractive / useful.
And best of all, these themes are user friendly and don’t require a lot of time to learn.
Customizing your WordPress installation
By now, you should have all of the following:
- A good hosting provider
- A nice domain name
- An installed WordPress theme.
What comes next is adding the finishing touches to your website and customizing its structure.
How to create pages for your website
Pages are the organizational elements of a website, such as the “About”, “Contact”, “Disclaimer” pages. Their main purpose is to help users navigate around a site to find information which isn’t available on the homepage.
To create a Page, simply go to the WordPress sidebar in the dashboard, and hover the mouse over the Pages tab. This will bring up two options: Add New and All Pages.
Pressing Add New will take you to a screen that lets you edit the Page according to your requirements.
Note 1: As a default, WordPress uses the title of the page as its URL. So, if you title your page as “I haz website”, then the url will look like this:
www.yoursite.com/i-haz-website.
Most of the times, you’ll probably be fine with this. But you can edit the link simply by pressing the Editbutton underneath the Title row.
Knowing how to edit links is good skill to have, because proper link structures help your SEO and search rankings.
Note 2: The Parent Page attribute allows you to create hierarchies for your pages. This is relevant because it affects how your pages are ordered.
For instance, if you create a page titled “My Work” and didn’t set a parent page for it, it would have the following URL:
www.yoursite.com/my-work.
Note 3: Set a Featured Image for your page/blog post.
Featured images are photos or other such media that you can put on top of your blog post or page to make it look cooler or more personalized.
There is no universal standard for how these photos will look. In other words, some themes will change the size or position of this featured image or even remove it altogether.
Adding Pages to Menus
Once you’ve created a Page, you need to make it accessible from the navigation menu, like the one we have on our own page.
To do this, go to the Appearance section of the website, and select Menus.
This takes you to a window that allows you to customize your navigation bar.
From here, you can configure which page goes to which menu. Your window might be a bit different than the one shown here, depending on the theme you chose to install. Overall though, it should be roughly the same process.
Create blog posts
To write a blog post, simply hover over the “Posts” button, and press “Add New”. This will take you to a word editing screen that looks nearly identical to the one in “Pages”.
The Posts section has a few extra sections such as Post Format, Categories and the Publish/Previewbuttons which we won’t cover in this article.
Customize your website
All WordPress themes come with the ability to do customizations and modifications. However, some themes only allow you only basic changes while others let you modify pretty much anything you want.
To customize your site, go to Appearance -> Customize. This will take you to a screen that should look something like this:
The exact customization options vary from theme to theme, so you might want to try out a few more if you want a certain feature.
Widgets
An important element of WordPress sites are widgets. These are special building blocks which contain software that has various functionalities such as:
- List of recent articles.
- Calendar.
- Contact forms.
- Categories
That’s just a sample of what widgets can do. Pairing widgets with the best plugins can add a lot more powerful features to your website.
Most WordPress themes usually display widgets on the side the screen, like this:

![[O-Image] Add A New Script Tool](https://lh3.googleusercontent.com/blogger_img_proxy/AEn0k_uC3anlFTSy3IbMERg8sHzxx-5tnqDuBeBx_bfAWumOlcSmBqT1Yo0YS-b8OtK3Cs6mTjgxl-m64ajGan3w1x91bN4EU0KbPEU7PlO0bQmGN7fjLhkqrX1W_fyLvUvshnpKl2dV79ubQDvXqxdkxpYRQJzMUhROf80ZoDPjcI7Z_Yclzljv4PSwW1nez4c=s0-d)
![[O-Image] Name the Script Tool](https://lh3.googleusercontent.com/blogger_img_proxy/AEn0k_tqRYwkxA4b3OhxexKSvcivIyEpiOpixfi1hLRk0lHtFfticZYdXUA_7JrLo_CqzHgUjkpNxgou-YsYhCEbFNZ8WuAqtaChk3r6OuX6MPQ7S1ppOnczM3JuWDy_thjytKfH5Nzxo3_uELJK5Jfp9iJXjeK62BiRza1tFcW8Cr9RHFFJRSBKPKYodVTrFCeF=s0-d)
![[O-Image] Browse to Python Script File](https://lh3.googleusercontent.com/blogger_img_proxy/AEn0k_u_y_q4AwSxCx6SWv-hHAkYWLl_R7Zqi0AgurX7R3A2-TRrVT5wiH7zRRAACsd9YqGXi32AVE1oNR1xLR383owHJiAZjg36maoNTzxTGpb01QD1tBjTiEg4XkDPfk4ReNwWrhYqSBtmUPN35BFOR-xpsBeBIl8DN5qPUAKX6S9xTnVXJKG-0VJdOeNEyBc=s0-d)
![[O-Image] Set the First Two Parameters](https://lh3.googleusercontent.com/blogger_img_proxy/AEn0k_s7aK1lzQtfIdkYuuDNi7JuFmC4p7Q5JgFj35zkD5j8wLeF0eZRVtCa3kXxmu7f3PC2SQ24dPpOavcN3xcuh4KC0kywSDG2AKszduCNlIadtAMTZ7zbY1gnVfFP5wASs_K7dJdACi06eNezttW3HGCkTvQCbdL1th18FUxloUGdN9bFc2mgWUgqeZd2hYjy=s0-d)
![[O-Image] Set Version List](https://lh3.googleusercontent.com/blogger_img_proxy/AEn0k_suizexqzjk7IUm6f71qkkV7egMKImvIoSAQq08NVWeyEOE5a0juWfcn_EV1pyOSajPgSnVJwaQCtfQuNjcHkAGCHlSB-8mF7weZRsaZHRM6GiE_7CON3Hem2mQVOQoIs_ziXBOzY7Qverf2-akIGPUE7-h4FfHd6_8VQjIOIQYKsgYsPWiLr3b3hQpCWU=s0-d)
![[O-Image] Open the Tool and Run It](https://lh3.googleusercontent.com/blogger_img_proxy/AEn0k_vNffXlAPNceKlsFZokwkxTD66Ittm7oixd_7z3KH7Qbk_WxoZR5q_Ew7a6FCpdVUaqPjHzM_QiqnZTUyP-m8VQ70LWYXdWJSLM1a3Zx6Bj5qB7PMRsVXYZkXSXVhbY3X6OUUCVIt2WTO7nCb2YG_ehhaPw-rplRQCkeksR-l1qTYsY1DyQ_JMsBf2_YGvg=s0-d)