
A step-by-step tutorial for building and deploying a full-stack e-commerce website using Next.js 13

It took me around one month to bring you this fully functional, fully responsive and beautiful looking full stack e-commerce project with the latest trending top notch technologies, I have covered all important topics of creating a ecommerce website such as product listing, product detail page, shopping cart, payment gateway and so on…
In this tutorial you’ll learn:
- Next.js 13 and its latest features
- Core feature of Next.js
- Server side rendering (SSR, SSG) in Next.js
- Dynamic Routing in Next.js
- Rapid UI building with Tailwind CSS
- Mobile first responsive approach
- Functional Programming through utility methods
- Strapi Headless CMS and its features
- How to fetch data from strapi api’s in next.js application
- Redux fundamentals and its best usage for cart functionality
- Complete cart functionality with add,update,delete actions
- Project deployment for frontend and backend
here is a beginner step-by-step tutorial on how to build and deploy a full-stack e-commerce website using Next.js 13:
Prerequisites:
- Basic knowledge of HTML, CSS, and JavaScript
- Familiarity with React and Node.js
- An IDE (such as Visual Studio Code) and a terminal
- A GitHub account
- A Firebase account
Step 1: Setting up the Next.js project
- Create a new Next.js project by running the following command in your terminal:
luanpx create-next-app
- Navigate to the project directory and run the following command to start the development server:
arduinonpm run dev
- Open http://localhost:3000/ in your browser to verify that the server is running.
Step 2: Creating the front-end of the e-commerce website
- Create a new folder called
pagesin your project directory. - Create a new file called
index.jsin thepagesfolder and add the following code to create the home page:
javascriptimport Head from 'next/head';
export default function Home() {
return (
<div>
<Head>
<title>Next.js E-commerce Website</title>
</Head>
<h1>Welcome to our E-commerce Website!</h1>
</div>
);
}
- Create a new file called
products.jsin thepagesfolder and add the following code to create the products page:
javascriptimport Head from 'next/head';
export default function Products() {
return (
<div>
<Head>
<title>Products - Next.js E-commerce Website</title>
</Head>
<h1>Products</h1>
</div>
);
}
- Update the
index.jsfile to include a link to theproductspage:
javascriptimport Head from 'next/head';
import Link from 'next/link';
export default function Home() {
return (
<div>
<Head>
<title>Next.js E-commerce Website</title>
</Head>
<h1>Welcome to our E-commerce Website!</h1>
<Link href="/products">View our products</Link>
</div>
);
}
- Add styles to your pages using CSS modules. Create a new file called
styles.module.cssin thepagesfolder and add the following styles:
css.container {
max-width: 960px;
margin: 0 auto;
}
h1 {
font-size: 3rem;
text-align: center;
margin: 2rem 0;
}
a {
display: block;
text-align: center;
font-size: 1.5rem;
margin: 2rem 0;
color: #333;
text-decoration: none;
border: 2px solid #333;
padding: 1rem;
border-radius: 5px;
}
a:hover {
background-color: #333;
color: #fff;
}
- Import the styles in your pages:
javascriptimport Head from 'next/head';
import Link from 'next/link';
import styles from '../styles.module.css';
export default function Home() {
return (
<div className={styles.container}>
<Head>
<title>Next.js E-commerce Website</title>
</Head>
<h1 className={styles.title}>Welcome to our E-commerce Website!</h1>
<Link href="/products">
<a className={styles.link}>View our products</a>
</Link>
</div>Setting up Next.js development environment
Let's start by preparing our environment, so we can start building. In your preferred terminal, type the following command:
npx create-next-app ecommerce-demo
A prompt will appear asking you to confirm the name of the project. After that, it will install all of the project dependencies for you. Then, run npm run dev to make our app available at localhost:3000.
Defining a layout
Next.js allows us to create a layout to hold files that will be repeated throughout our application, such as our Header and Footer Components, which are fixed across all pages of our e-commerce application.
Once we are done setting up the layout component, we will add it to the app's main entry point which is located at pages/_app.js via MyApp function which returns the pageProps.
Creating Layout components
For this, we will create a Layout component as well as two additional components for our application's Header and Footer. To begin, we will create a components folder in the base folder, where we will now store all components. Begin by writing the following code in a Header.js file:
// components/Header.jsimport Link from 'next/link';import styles from '../styles/components/Header.module.css';const Header = () => {return (<nav className={styles.navbar}><Link href="/"><a><div className={styles.logo}><p>PLANTS <span className={styles.logo_span}>☘</span></p></div></a></Link><div className={styles.nav_price}><span>🛒</span><p>$0.00</p></div></nav>);};export default Header;
Still, in the components directory, let’s also create a Footer.js file for the footer with the following content:
// components/Footer.jsimport styles from '../styles/components/Footer.module.css';const Footer = () => {return (<footer className={styles.footer}><p>All Rights Reserved. Copyright © 2022</p></footer>);};export default Footer;
Integrating components into Layout
Let's now integrate those components into our app by first creating a Layout component that will take the children's props and place them wherever we want. In our case, we want the following pages to appear between the header and footer components:
// components/Layout.jsimport Header from './Header';import Footer from './Footer';const Layout = ({ children }) => {return (<div><Header />{children}<Footer /></div>);};export default Layout;
Finally, with our layout components created, all that's left to do is to add it to the **_app.js** file, so as to configure our app’s layout:
// _app.jsimport Layout from '../components/Layout';import '../styles/globals.css';function MyApp({ Component, pageProps }) {return (<><Layout><Component {...pageProps} /></Layout></>);}export default MyApp;
If you launch your app in dev mode and navigate to your localhost page, you should now see your app's layout. To obtain the CSS files from the styles folder, go to the starter repository. Now it's time to give our homepage the content it deserves.
Customizing our homepage
So far we have been able to set up our app layout, let’s now work on the index/home page of our application which is the pages/index.js file.
Note: Ensure you visit the repository, to get the products array via pages/data/products.json to get all the data, also ensure you get the images from public/images folder.
For this, we will also pre-render the data we will be getting from pages/data/products.json via **getStaticProps**, which fetches data at build time. This is what our code will look like:
// pages/index.jsimport allProducts from './data/products.json';import Head from 'next/head';import Link from 'next/link';import styles from '../styles/Home.module.css';export default function Home({ allProducts }) {return (<><Head><title>Plants | Home</title></Head><div className="container"><h2 className={styles.title}>All Products <span>🌿</span></h2><div className={styles.products_container}>{allProducts.map((product) => {return (<div className={styles.product_card} key={product.id}><Link href={`products/${product.slug}`}><a><div className={styles.product_img}><img src={product.image.url} alt={product.name} /></div></a></Link><div className={styles.product_content}><h3>{product.name}</h3><p>${product.price}</p><button className="btn">Add to cart 🛒</button></div></div>);})}</div></div></>);}export async function getStaticProps() {return {props: {allProducts,},};}
We returned the data as props and then looped through all the products using JavaScript’s map() iterator method.
Dynamic routing for each product
When a user attempts to purchase a product, the user will first click on the product to read more information about that specific product. On the development side, you may believe that individual pages are created for each product, but this will be cumbersome and difficult to maintain. This is the reason for dynamic routing.
This would be properly implemented when we fetch data from Hygraph, but for now, let’s create a component in a folder inside the pages' folder. This would look like this pages/products/[productslug].js. In this component, we will add the following code:
// pages/products/[productslug].jsimport Head from 'next/head';import styles from '../../styles/SingleProduct.module.css';const singleproduct = () => {return (<><Head><title>Dracaena fragrans</title></Head><div className={styles.single_container}><div className={styles.left_section}><img src="/images/croton.png" className={styles.left_img} alt="" /></div><div className={styles.right_section}><h3 className={styles.title}>Dracaena fragrans</h3><p className={styles.price}>$50</p><div className={styles.para}><p>Lorem ipsum dolor sit amet consectetur adipisicing elit. Atimpedit voluptatum vitae labore molestiae, maiores, hic adofficiis laudantium in officia, nam vel quod! Nesciunt aperiamexplicabo facere laboriosam eius.</p></div><button className="btn">Add to cart 🛒</button></div></div></>);};export default singleproduct;
We manually entered all the data in the preceding code, but we will retrieve them from Hygraph shortly. So far, we have been successful in establishing our e-commerce application. If anything confuses you, or if you were unable to configure your app to produce similar results, make sure to check out the starter repository and compare your codes.
Hygraph
Hygraph is a cutting-edge content management platform that enables teams to provide content to any channel. If this is your first time exploring Hygraph, create a free-forever developer account via either GitHub, Mail, e.t.c.
We will be making use of Hygraph to store and manage all the products we will be using for our e-commerce web application. Once we have created an account or signed In, we can now create a project using any project name of our choice and location that is close to you. At this point, we now have our project set up and the next step would be to create our schema.
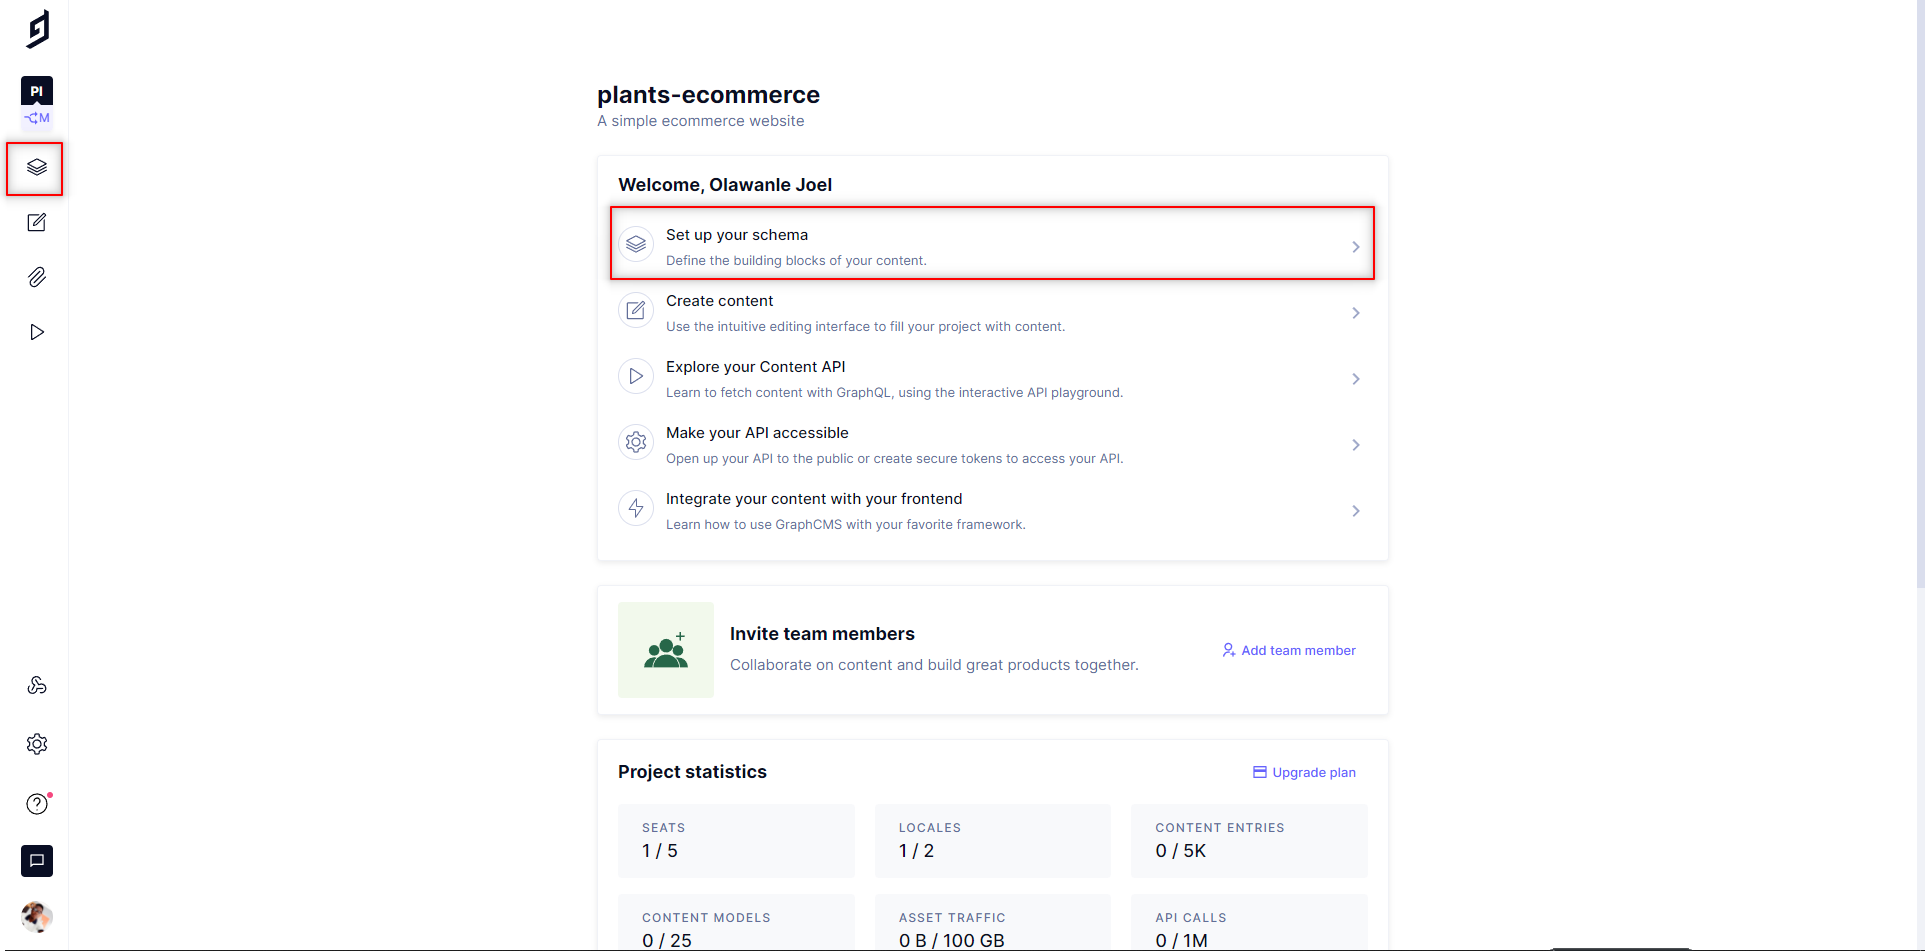
Set up Schema
Schema is the structure we develop for storing our content on Hygraph and for us to set up our schema, we can either click on the schema icon in the sidebar or the highlighted steps as seen below:
The next step would be to create a model, since we are creating an e-commerce application the major model we need to create is the products model to store all our products
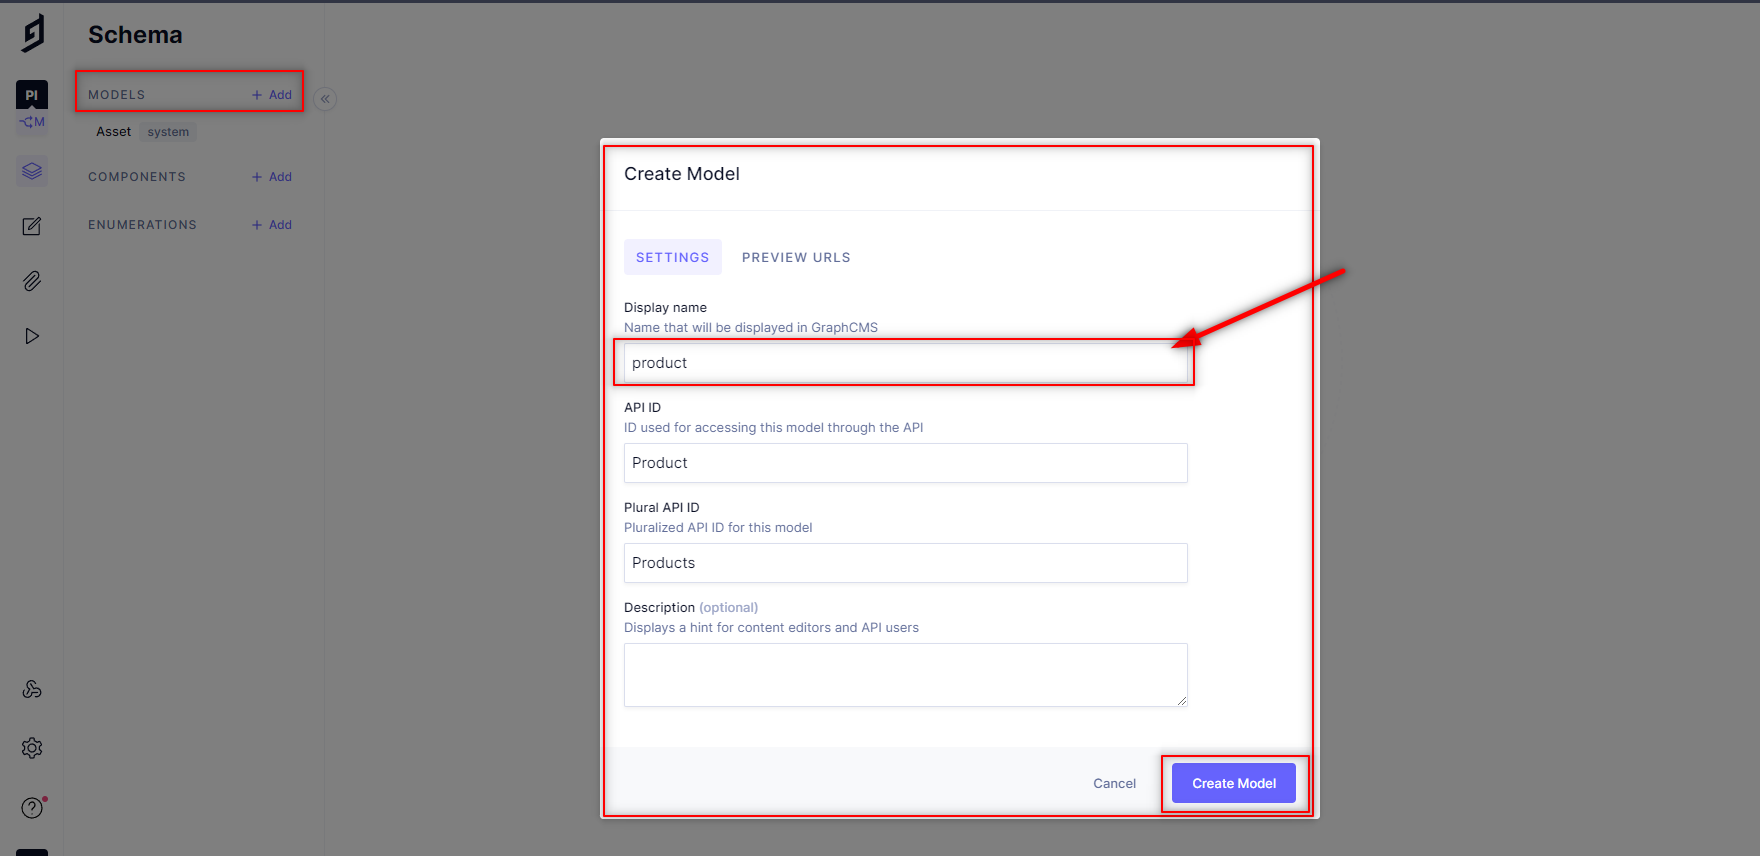
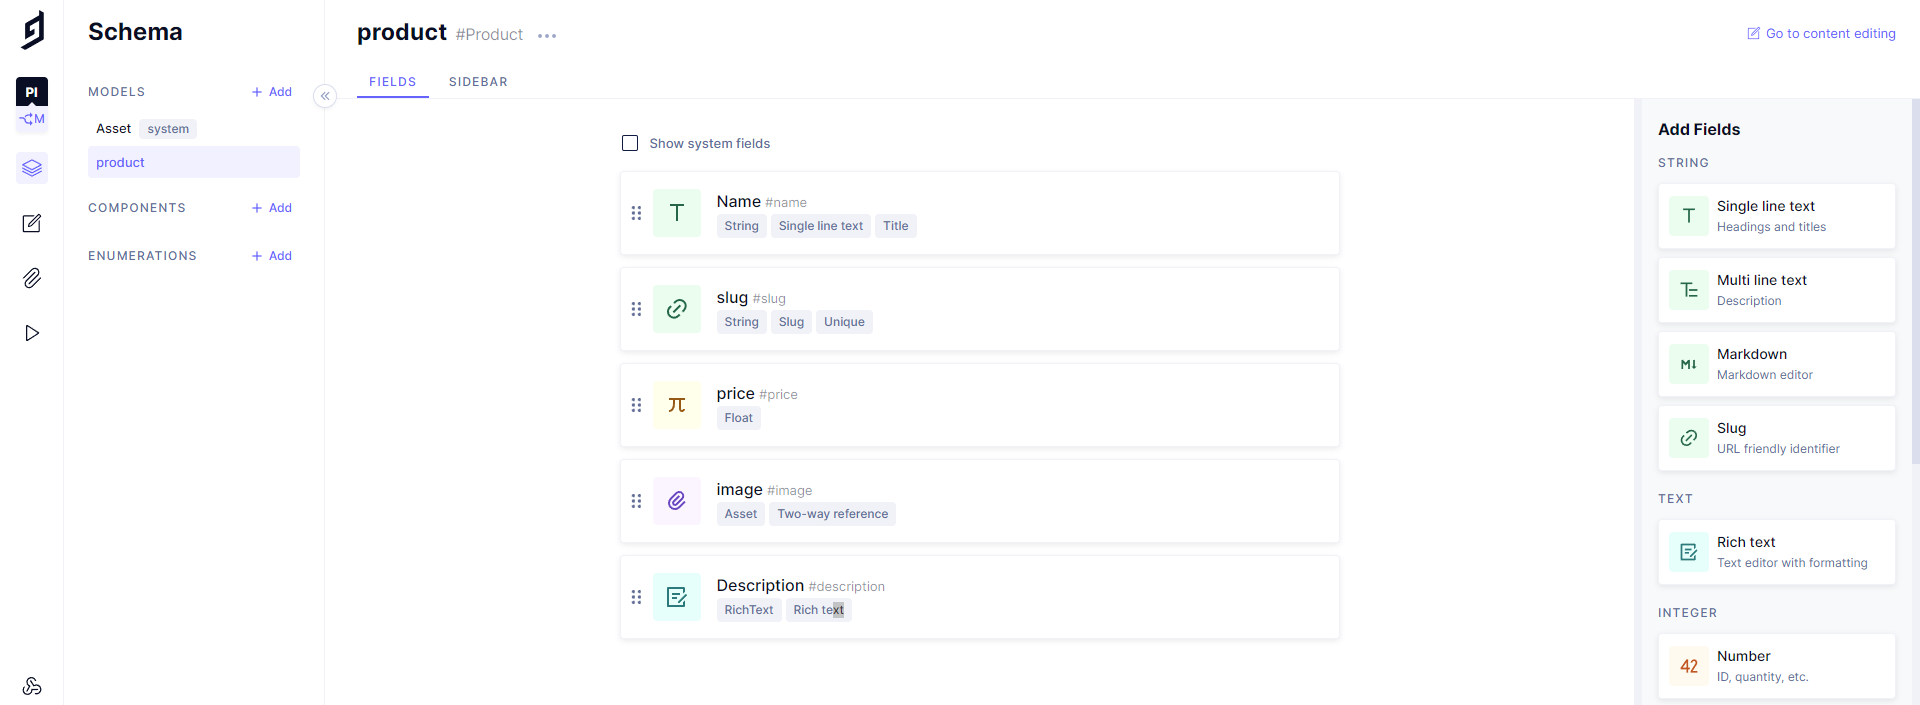
The next step would be to add our desired fields for the content we wish to store, such as product name, image, description, price, e.t.c
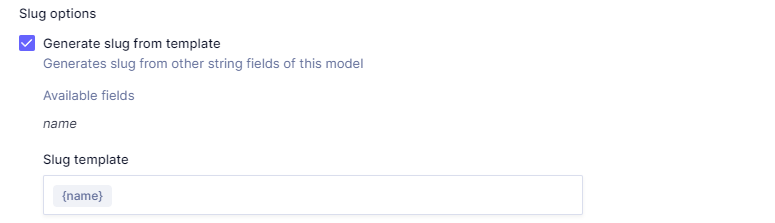
Note: slug is generated from the name template as seen below:
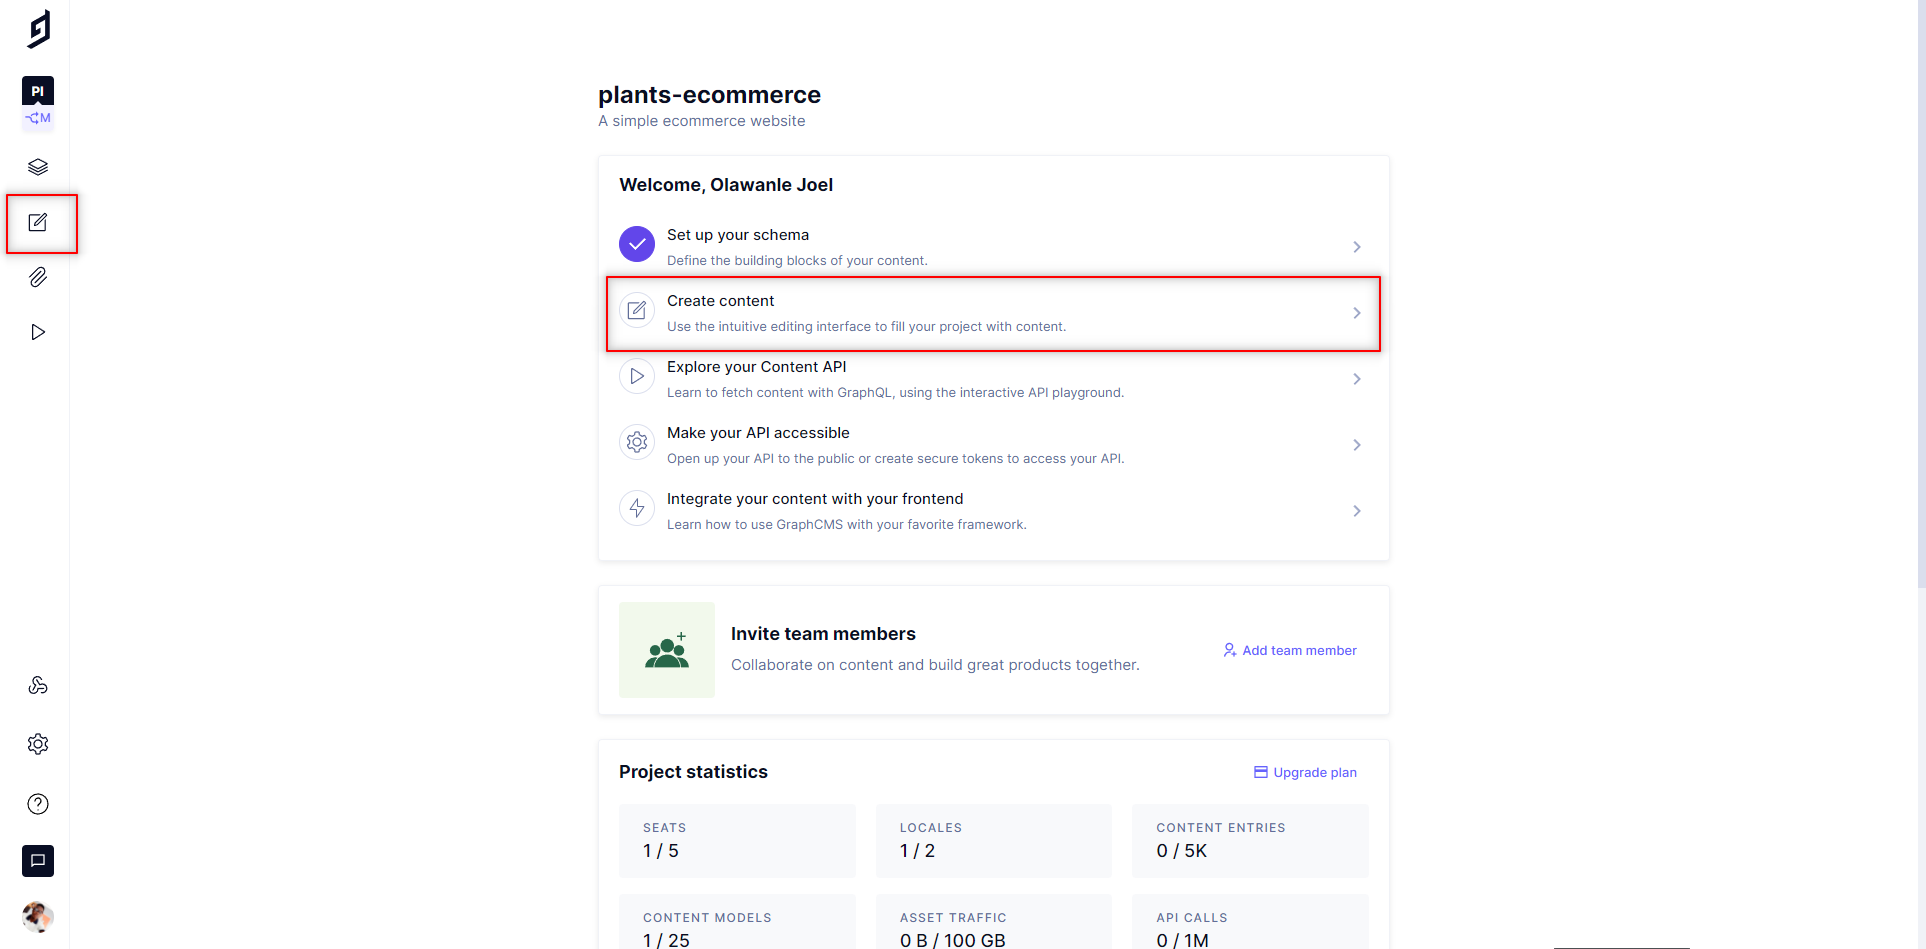
Create & Add content
Once we are done setting up our schema the next step would to start creating/adding our products to the product model based on the fields we created, to do this we can either visit the editing interface via the icon on the sidebar or the highlighted steps as seen below:
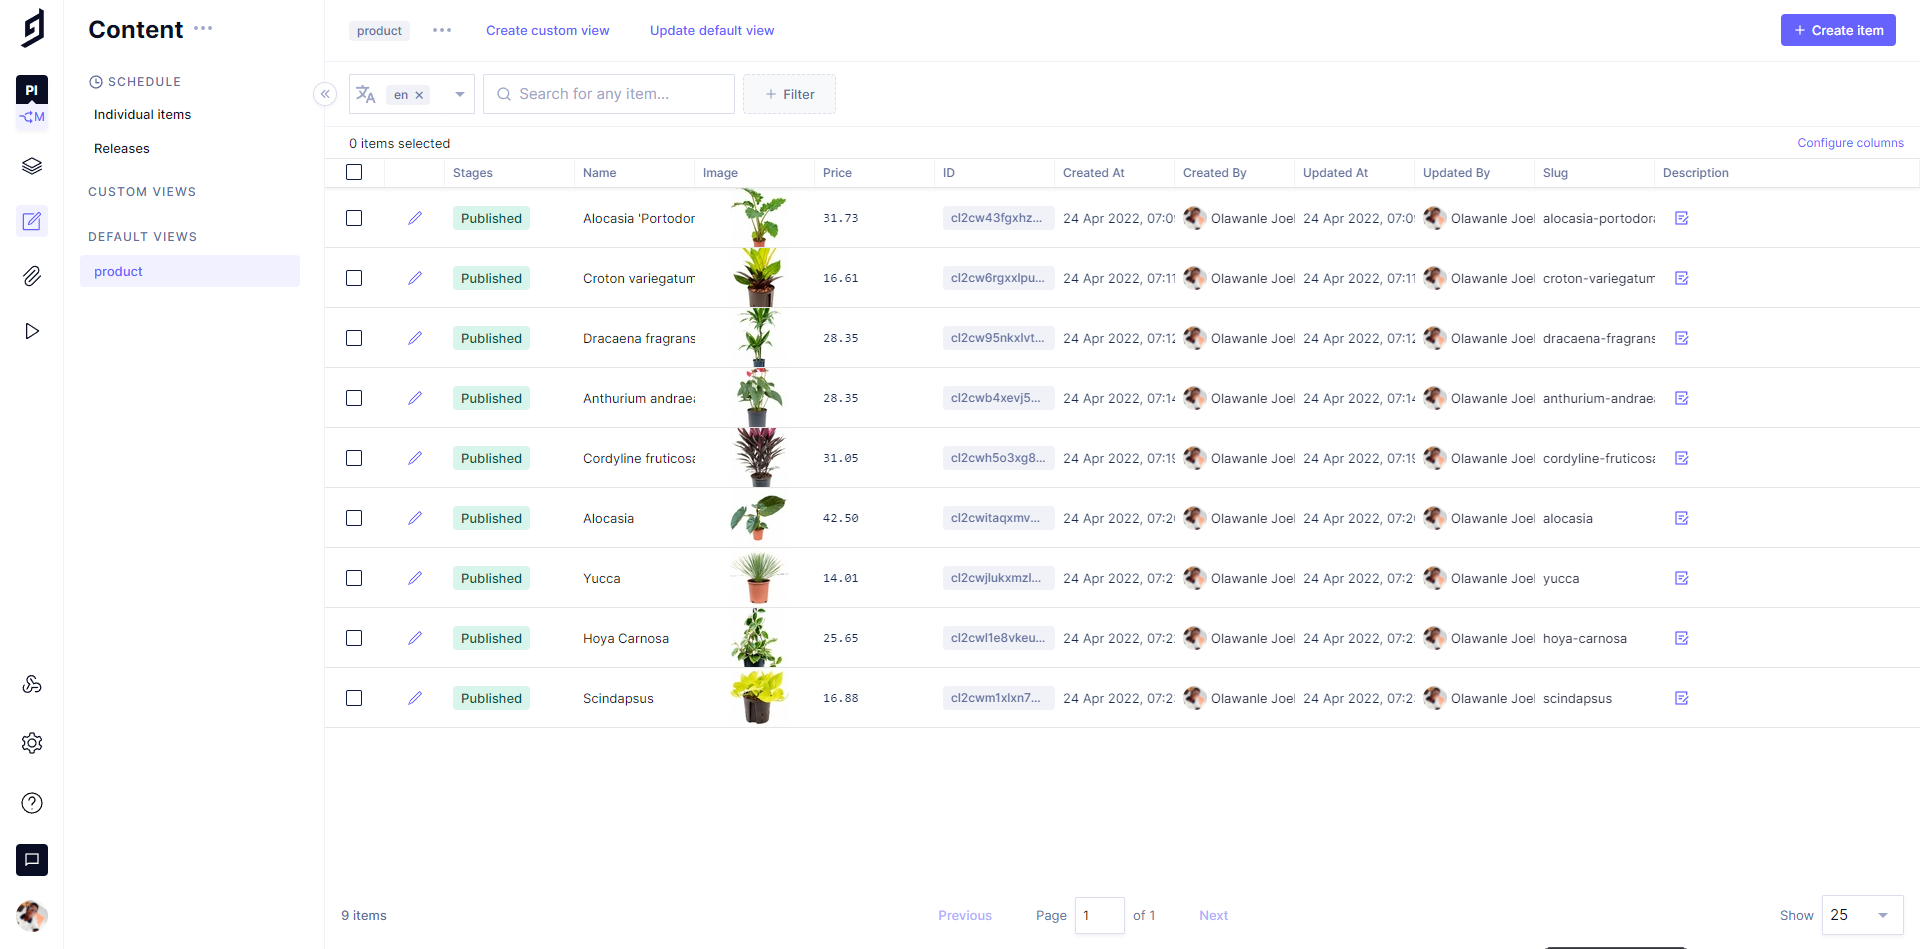
We can now click on the model we want to create items for, suppose we have multiple models, and then go ahead to click the “create item” button. Ensure you save and publish them as soon as you are done inputting each content. Once that is done, your model will now have some contents we can fetch into our eCommerce store.
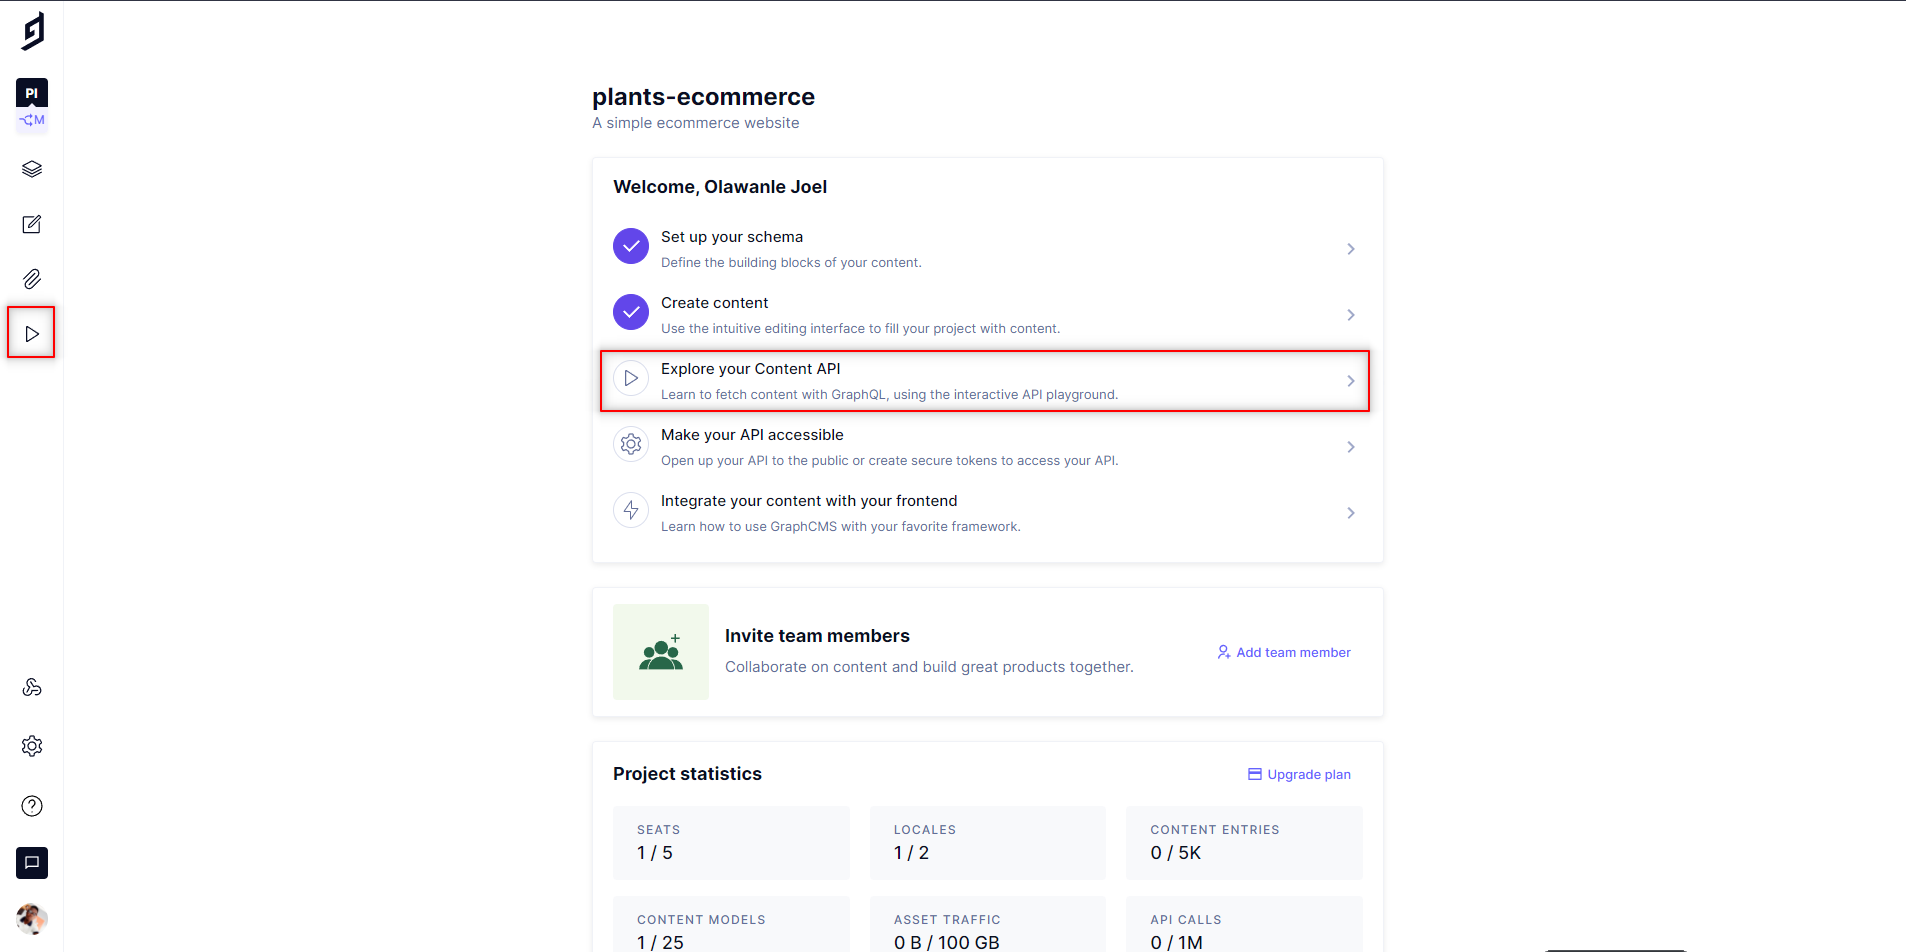
Explore Content API
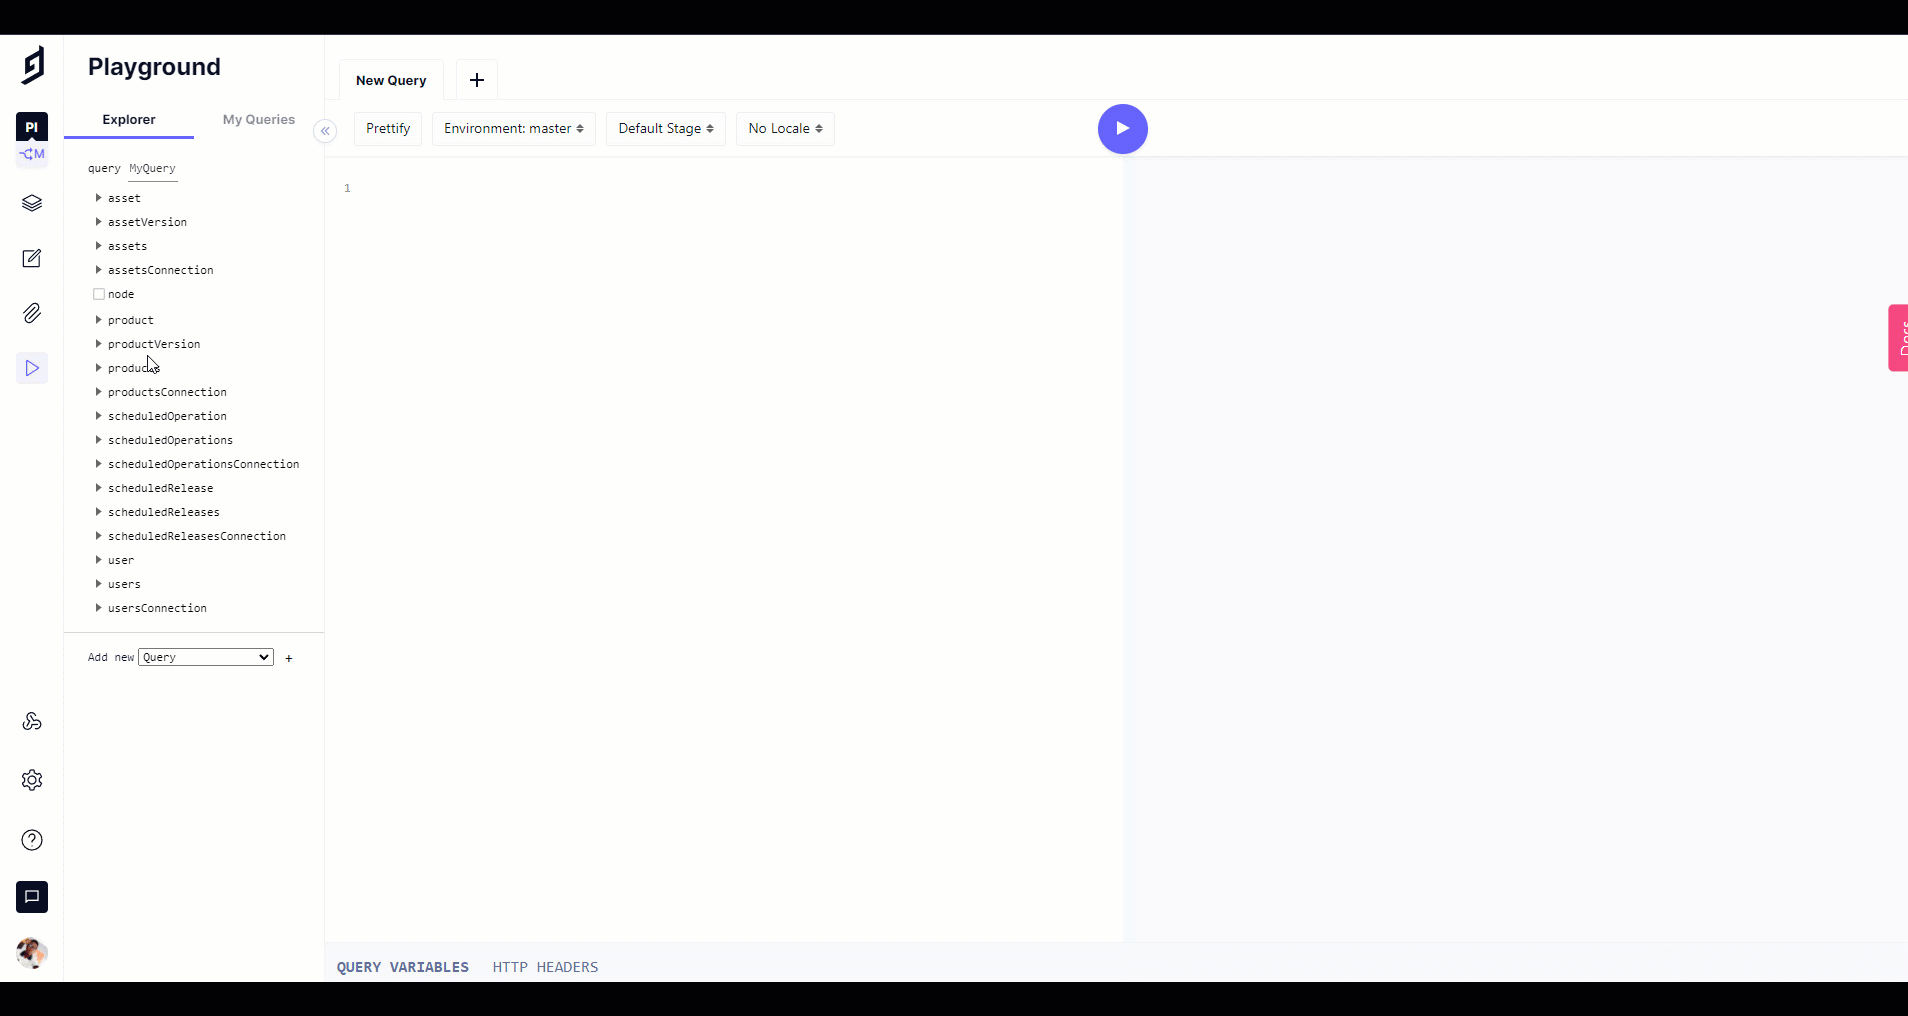
So far we have been able to set up Hygraph and also added our content, the next step would be to learn how to query Hygraph. We would make use of the inbuilt GraphQL Explorer to create our query, we do this by visiting the Hygraph API playground as seen below:
This would take us to the GraphQL Explorer where we can create our query easily even if we are not used to GraphQL by just ticking the boxes:

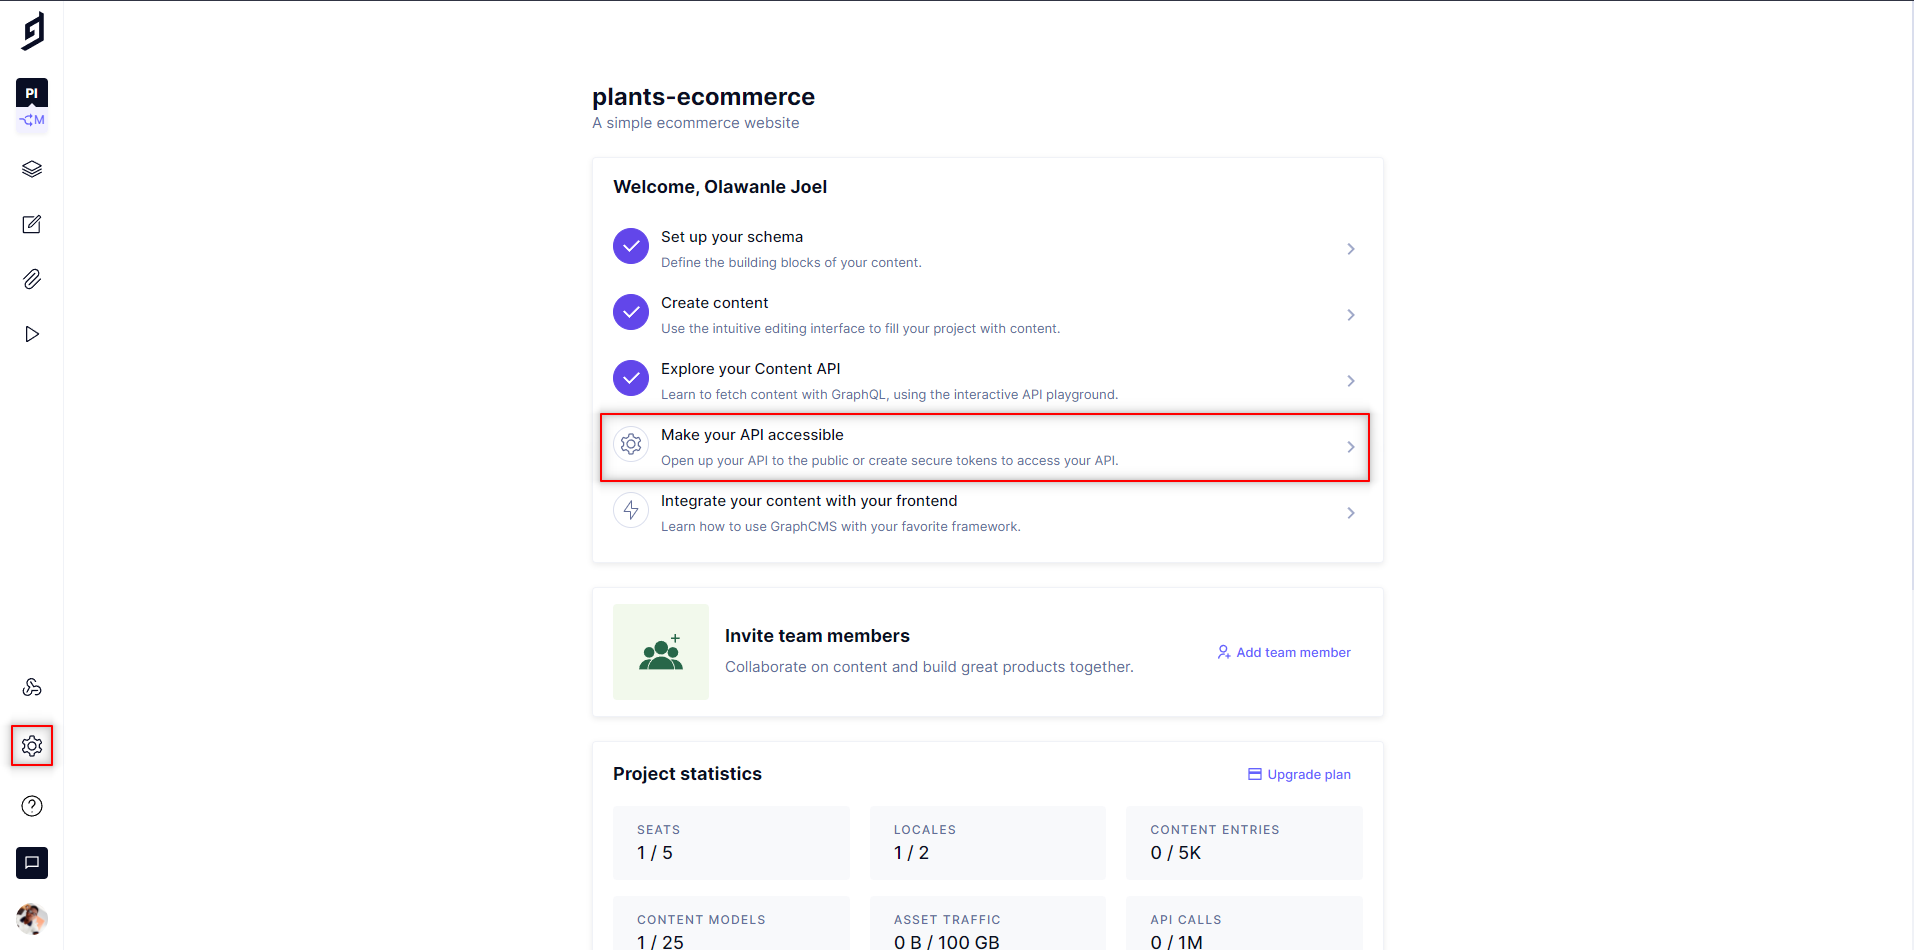
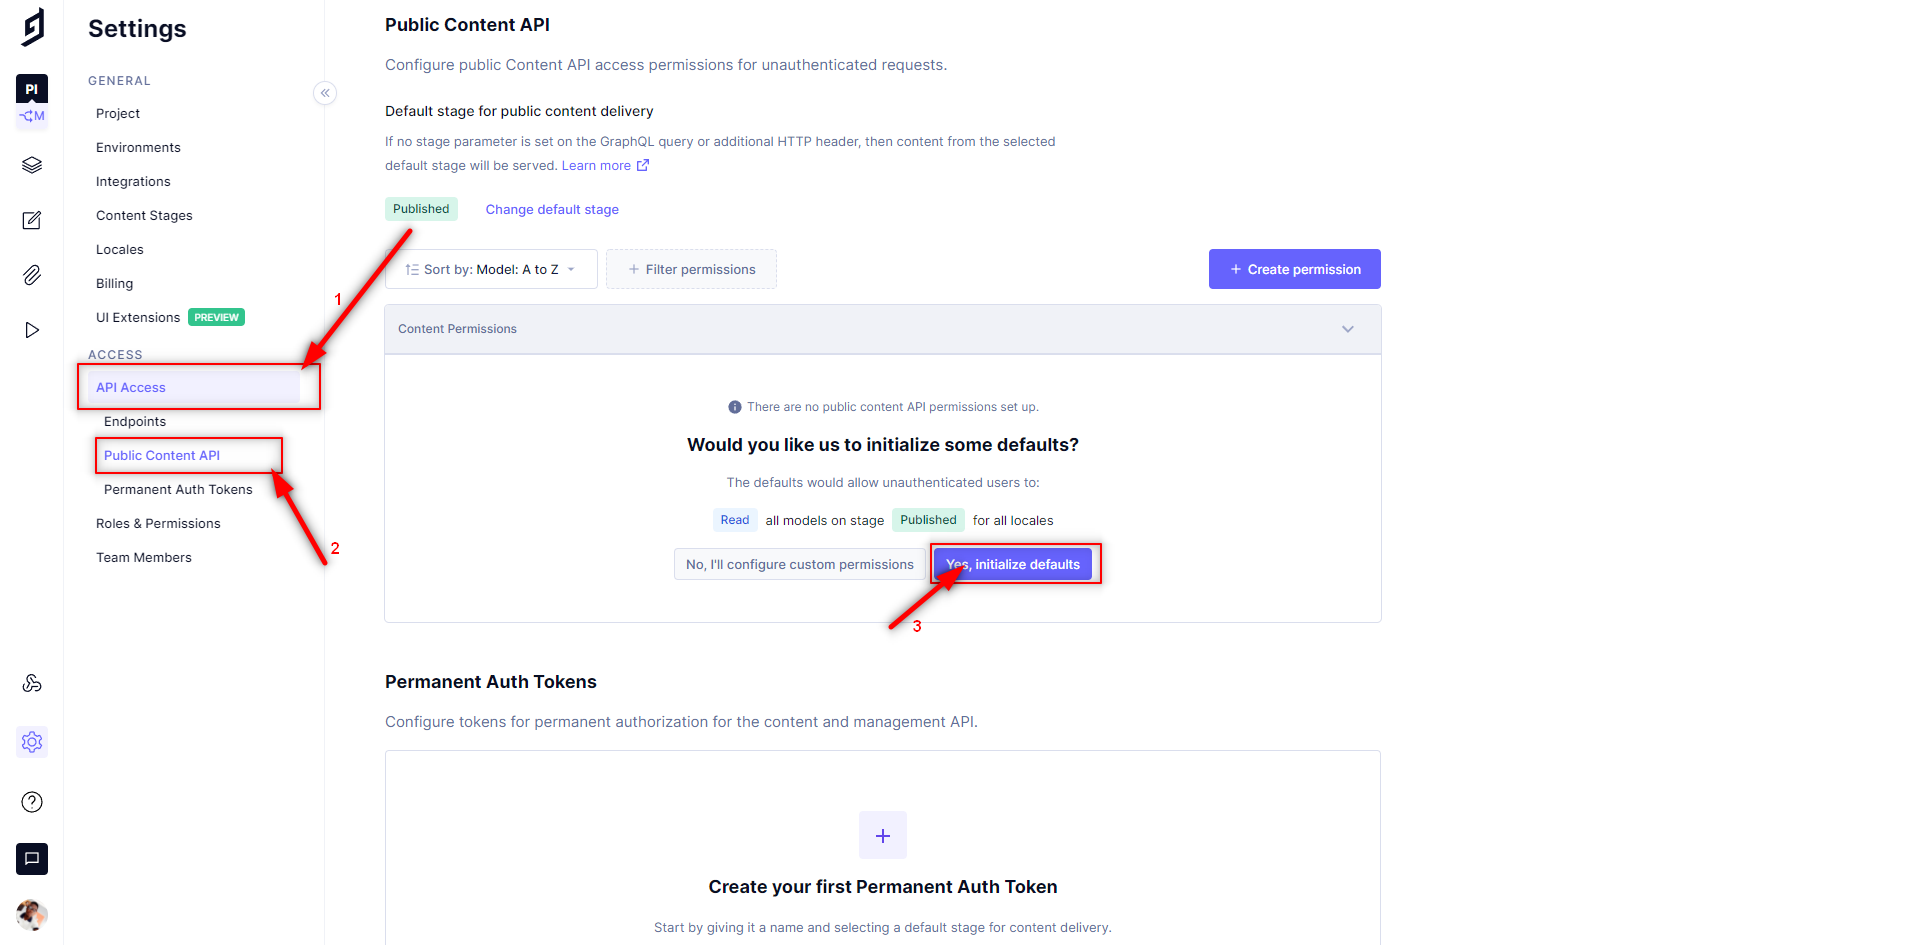
Make API Accessible
At this point we have our contents, and we have been able to come up with a query, but we also need to make our API accessible so that these contents can be fetched via the API, to do this we can either click the settings icon on the sidebar or the highlighted steps as seen below:
We can now initialize by defaults or maybe create permissions if you wish:
We would now click on Endpoints to get our content API, which would be used to get content from Hygraph when fetching our data via Apollo client in our Next.js web app.
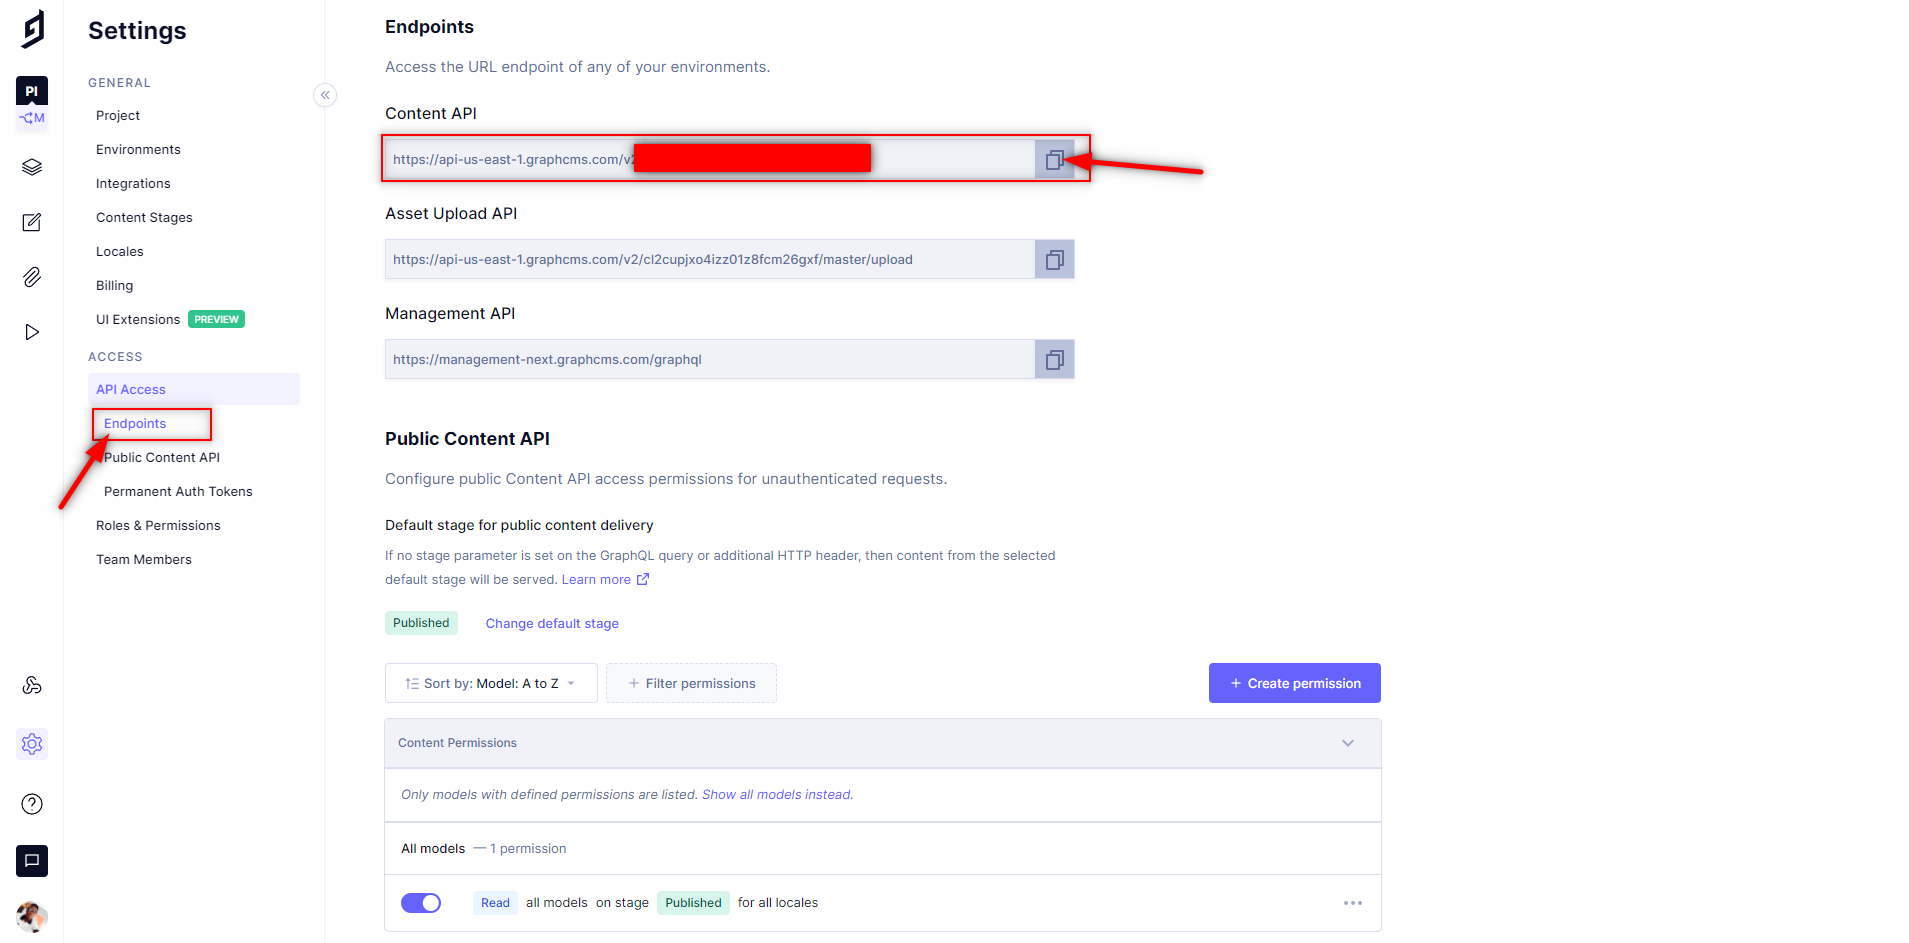
Note: Ensure you keep this API link as we would make use of it soon.
Fetch data from Hygraph with GraphQL
Once we have successfully set up Hygraph and created our GraphQL query, the next step would be to query Hygraph via our Next.js web app. The first step would be to install Apollo client and GraphQL, which would enable us to construct the query we would send with Apollo:
npm install @apollo/client graphql
Once this is successful, the next step would be to initialize Apollo client by first importing Apollo client, InMemoryCache and gql from @apollo/client
import { ApolloClient, InMemoryCache, gql } from '@apollo/client';
Once we have imported, we can now proceed to initialize Apollo client to allow us to fetch via our query later on, but for us to initialize, it would be best to make use of the getStaticProps() function so that the content is fetched at build time:
export async function getStaticProps(context) {return {props: {},}}
We can now initialize apollo client within the getStaticprops() function as seen below:
export async function getStaticProps() {const client = new ApolloClient({uri: 'https://api-us-east-1.hygraph.com/v2/cl2cupjxo4izz01z8fcm26gxf/master',cache: new InMemoryCache(),});return {props: {},};}
Note: In the code above, we will make use of the content API we copied from Hygraph Endpoints.
Once that is done, the next step would be to get our data via the GraphQL query we created while exploring the Hygraph content API as seen below:
const data = await client.query({query: gql`query ProductsQuery {products {idnameslugpriceimage {url}}}`,});
At the end of the day, our getStaticProps() function will look like this:
export async function getStaticProps() {const client = new ApolloClient({uri: 'https://api-us-east-1.hygraph.com/v2/cl2cupjxo4izz01z8fcm26gxf/master',cache: new InMemoryCache(),});const data = await client.query({query: gql`query ProductsQuery {products {idnameslugpriceimage {url}}}`,});const allProducts = data.data.products;return {props: {allProducts,},};}
Note: We assigned the products array to a new variable, so it’s easier to work with, you can decide to log out the data in your console/terminal to be sure everything works fine. If you are not familiar with getStaticProps() function check here.
Making use of data
So far we have been able to fetch our data via getStaticProps() function so that the content is fetched at build time, let's now make use of these props within our web application by passing in the props:
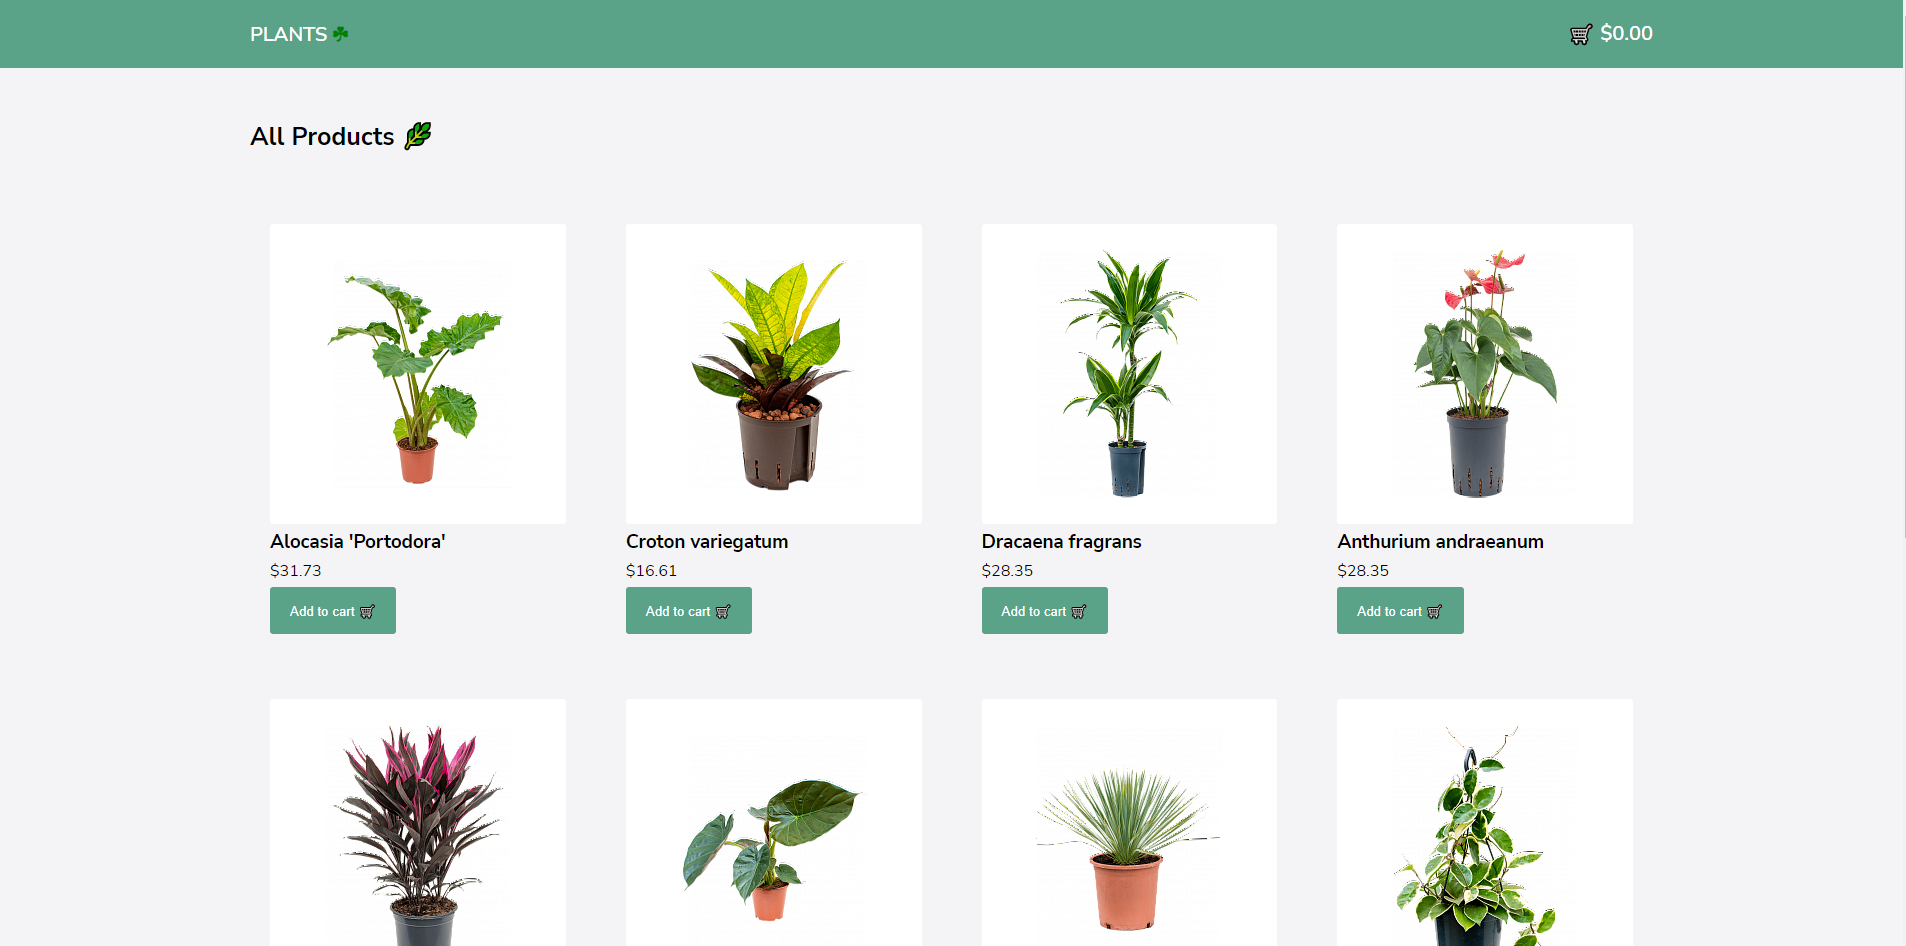
import Link from 'next/link';export default function Home({ allProducts }) {return (<div className="container"><h2 className="title">All Products 🌿</h2><div className="products-container">{allProducts.map((product) => {return (<div className="product-card" key={product.id}><Link href={`products/${product.slug}`}><div className="product-img"><img src={product.image.url} alt={product.name} /></div></Link><div className="product-content"><h3>{product.name}</h3><p>${product.price}</p><a className="btn">Add to cart 🛒</a></div></div>);})}</div></div>);}
In the above, we destructured props to get the variable without needing to make use of props.``*allProducts*. We looped through the data, and our app should now look like this:
Dynamic Page creation for each product
For this, we will make use of getStaticPath() function which allows us to define all the paths to be statically generated for that route. Simply we want to be able to access a route link - http://localhost:3000/products/slug where the slug would be dynamic based on the product being fetched.
To do this we are going to make use of dynamic routes which allows us to create dynamic routes with square brackets so that inside the bracket we have a parameter that can be used as the path to dynamically request the page we want to display.
To do this, we would create a file: products/[productSlug].js, then the next thing will be to tell next.js every single path and the slug that corresponds to the path. For this, we will use getStaticPath() function which would return an object, but this time around not props but an array of paths. This would be done similarly to what we fetched contents earlier:
The first step would be to import apollo client, InMemoryCache and gql from @apollo/client
import { ApolloClient, InMemoryCache, gql } from '@apollo/client';
And then we can now initialize and query Hygraph via apollo client:
export async function getStaticPaths() {const client = new ApolloClient({uri: 'https://api-us-east-1.hygraph.com/v2/cl2cupjxo4izz01z8fcm26gxf/master',cache: new InMemoryCache(),});const data = await client.query({query: gql`query ProductsQuery {products {idnameslugpriceimage {url}}}`,});const paths = data.data.products.map((singleProduct) => {return {params: {productslug: singleProduct.slug,},};});return {paths,fallback: false,};}
In the above code, you will also notice that we looped through the entire products and returned all the slugs, and then returned the entire slugs via the paths array.
The next step would be to make use of the getStaticProps() function like before to query Hygraph for the particular product that matches our slug, let’s first visit Hygraph API playground to come up with the GraphQL query which would check for a particular slug parameter:
Once that is done, we can now make use of the query in the getStaticProps() function:
export async function getStaticProps({ params }) {const client = new ApolloClient({uri: 'https://api-us-east-1.hygraph.com/v2/cl2cupjxo4izz01z8fcm26gxf/master',cache: new InMemoryCache(),});const data = await client.query({query: gql`query MyQuery($slug: String) {product(where: { slug: $slug }) {idnamepriceslugdescription {html}image {url}}}`,variables: {slug: params.productslug,},});const product = data.data.product;return {props: {product,},};}
Note: at the end of the query request, we added the variables property to set the slug we want to fetch.
Once this is successful, we can now add this props to this web app page so we can display the fetched content:
const singleproduct = ({ product }) => {return (<div className="container single-container"><div className="left-section"><Image src={product.image.url} width={300} height={700} alt="" /></div><div className="right-section"><h3>{product.name}</h3><p className="price">${product.price}</p><divdangerouslySetInnerHTML={{__html: product.description.html,}}></div><a className="btn">Add to cart 🛒</a></div></div>);};export default singleproduct;
Implementing Shopping cart and checkout with Snipcart
Hygraph alone can't provide out-of-the-box eCommerce experiences, but paired with other APIs, it's possible to connect Hygraph with a variety of eCommerce APIs to deliver rich buying experiences. You can check here for some headless commerce APIs of which we would be making use, one of which is Snipcart.
Snipcart makes it easy to add a shopping cart to any website and also add a payment gateway easily. The first step is for us to register or sign in, activate our account, and fill in all necessary details. For this guide, we will make use of the test mode just to explain the development process, I also recommend you first work with the test mode before switching to live mode.
Installation
Let’s get started by installing Snipcart to our web application, we need to create a custom document page which is going to allow us to modify outside the body and load the Snipcart installation scripts so that they load globally. This file will be created in the pages folder and named _document.js. Paste the code below into the file:
import { Html, Head, Main, NextScript } from 'next/document';export default function Document() {return (<Html><Head><link rel="preconnect" href="<https://app.snipcart.com>" /><link rel="preconnect" href="<https://cdn.snipcart.com>" /><linkrel="stylesheet"href="https://cdn.snipcart.com/themes/v3.2.0/default/snipcart.css"/></Head><body><Main /><NextScript /><script async src="https://cdn.snipcart.com/themes/v3.2.0/default/snipcart.js"></script><div hidden id="snipcart" data-api-key="YOUR_PUBLIC_API_KEY"></div></body></Html>);}
In the above code, we have imported Snipcart globally. The only thing we have to do now inserts our API Key into the hidden div. You can get your API key from the dashboard credentials page. Ensure you restart your server anytime you update this page.
Adding products to the cart
At this point, we now have to work on our “Add to cart” button so that anytime it’s clicked for a particular item, that item would be added to the cart. To do this, we add some attributes to our button, these attributes consists of information like the product name, price, description, images, etc.:
<buttonclassName="btn snipcart-add-item"data-item-id={product.id}data-item-price={product.price}data-item-url={`products/${product.slug}`}data-item-image={product.image.url}data-item-name={product.name}>Add to cart 🛒</button>
At this point, when you add any item to the cart, a page like this will appear having the information about the item:
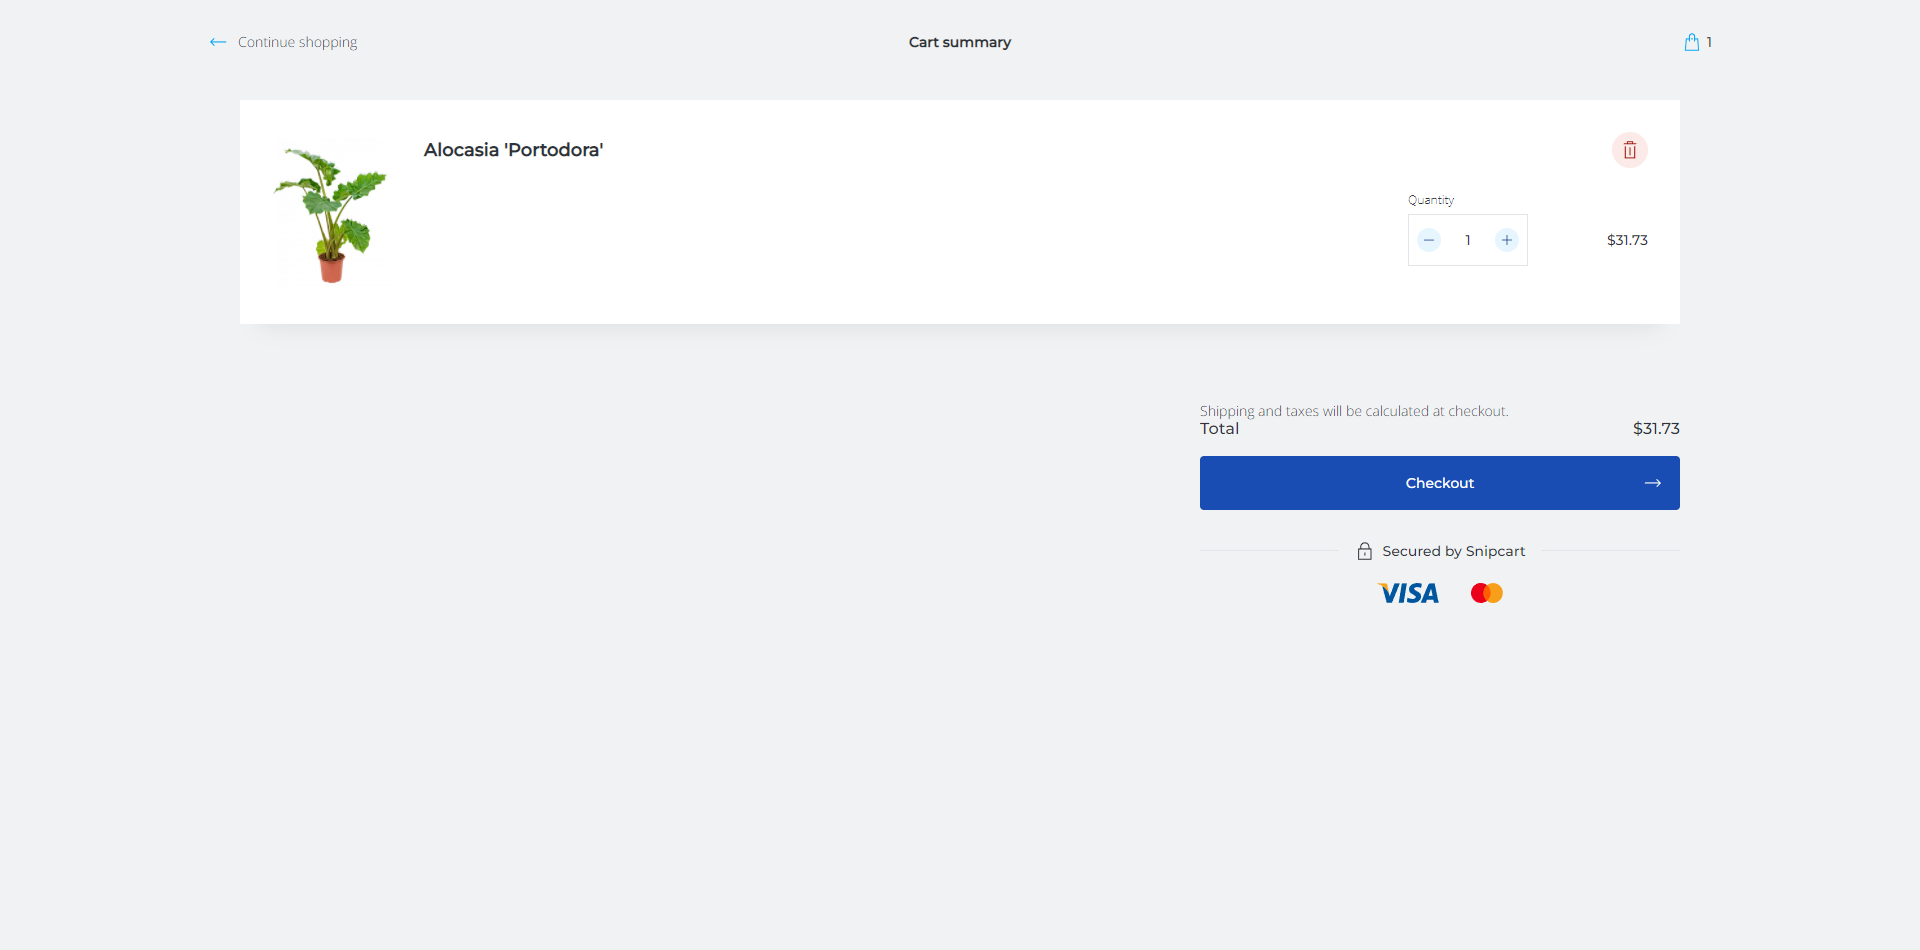
We can customize our cart, but for this guide, we will only make our cart appear as a sidebar rather than a full screen. To do that, we will add data-config-modal-style=``"``side``" to the hidden div in the _document.js file.
<div hidden id="snipcart" data-api-key="YOUR_PUBLIC_API_KEY" data-config-modal-style="side"></div>
Note: Let’s ensure we update the “Add to cart” button on the single products page which is being fetched dynamically, so it can also be used to add products to the cart as it should.
Working on Navbar price
Finally, we need to make the price tag on the Navbar reflect the actual total price, and also when we click the price we want the cart summary to open up as a sidebar, so we see the items in our cart.

With Snipcart, we perform all these functions by just adding classes to our markup. To add the total price to the tag we add *className*``="snipcart-total-price" while to make the text clickable, so it shows the cart summary, we add *className*``="snipcart-checkout``" meaning, the price section of our Navbar will look like this:
<nav className="navbar container">...<div className="nav-price snipcart-checkout"><span>🛒</span><p className="snipcart-total-price">$0.00</p></div></nav>
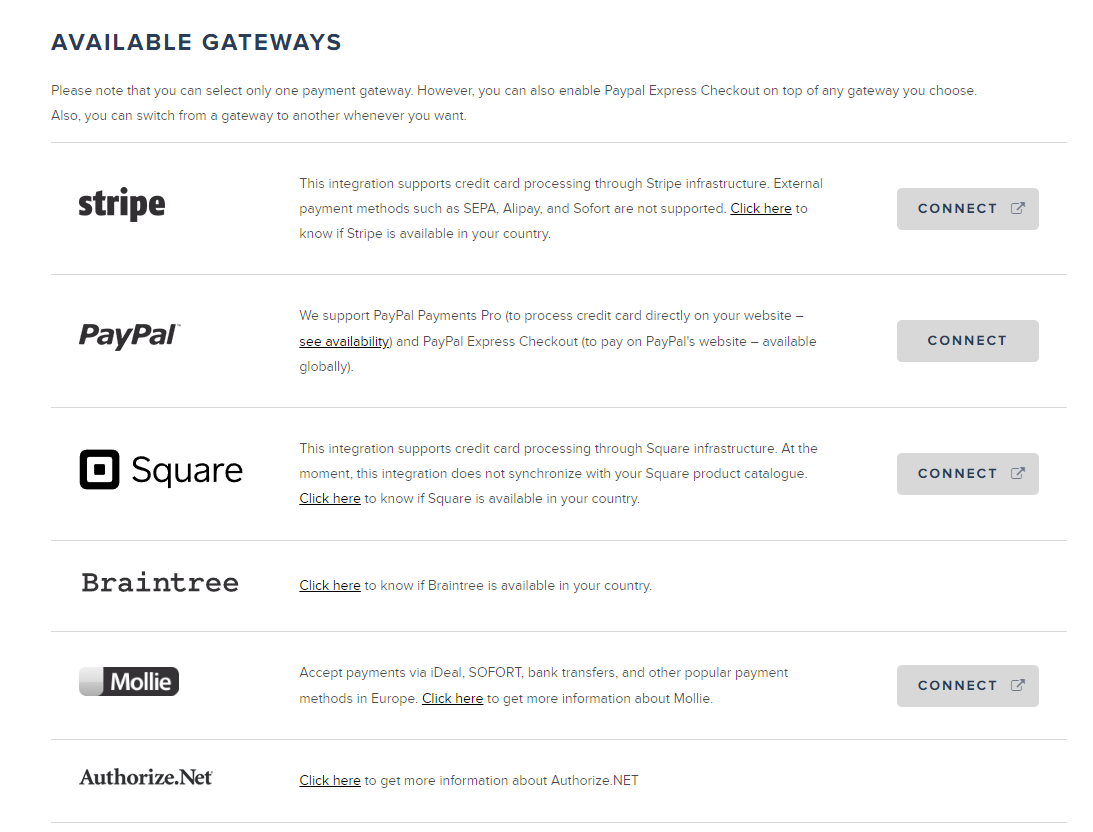
Add Payment gateway in Snipcart
Finally, adding a payment gateway in Snipcart is very easy, all you have to do is ensure you are signed in and then visit the payment gateway page. On this page you will find up to 5 payment gateways, make use of anyone you prefer as all you just have to do is create an account and then click on the connect button to authorize access.
Conclusion
In this guide, we were able to learn how to create an eCommerce application that retrieved content from Hygraph using this guide. There is a lot that can be done with Hygraph, one of which is product data localization. We also learned how server-side data fetching works, as well as how to integrate Snipcart to handle carting and checkout.
No comments:
Post a Comment
Thanks for your comments