As a rule, microservice projects consist of several individual services operated separately as deployment units and call each. This has consequences for the whole system’s security. Each individual microservice must obey certain security guidelines. But this alone is not enough; communication with the other services must also be secured. Only through both measures can the network of services achieve a security standard, which is much easier to achieve in a monolithic system. The administrative handling of certificates for Transport Layer Security (TLS) can cause considerable effort in a distributed system.
The high number of independent services increases the probability of a security gap. As soon as new Common Vulnerabilities and Exposures (CVEs) are published, they must quickly be patched in several services. This security risk is only eliminated when all microservices have been redeployed. A potential attacker is spoiled for choice as to which service they should try to compromise first. If their attempt at attacking the first microservice is unsuccessful, then there are still plenty of other “victims” to penetrate via the network of microservices. If the services are accessed via an unsecured connection, the hacker has even more opportunities to break into the overall system.
Zero Trust
If you think these security problems with microservices through to their logical conclusion, you will see that only a zero trust approach can provide sufficient security protection. Zero trust means that basically no (micro) service can be trusted, not even if it is located in a trusted zone. Every request between the services must be authenticated (AuthN), authorized (AuthZ), and secured using TLS. A JSON Web Token (JWT) is often used as an authentication feature, which must be sent with each request, identifying the caller. This JWT is either used end-to-end, where it is not exchanged during the entire call chain, or a TokenExchangeService generates a new token for each individual request. Last but not least, the protection should take place on the HTTP or gRPC layer (OSI Layer 7 Application), and in the underlying network layers Transport and Network (OSI Layer 4 and 3). This satisfies the OWASP security principle of Defense in Depth.
Not every employee responsible for security wants to take this final step. Implementing zero trust is not trivial. On the contrary, employees often draw the (wrong) conclusion that the effort required for zero trust is too high, even if their inner security voice tells them it is the right approach.
Zero Trust for Microservices
Some functionalities must be implemented for zero trust in microservices as a consequence of our previous considerations.
Each request must contain information about the caller. The easiest way to do this is to send a JWT as a Bearer type in the HTTP Authorization header. The called service validates this JWT and then performs the necessary authorization checks. If a service mesh tool is used, this check can also be performed or supplemented by a sidecar (more on this in the following sections).
SSL certificates are required to secure communication with TLS. They become invalid after a certain time interval and must be replaced. This cannot be done manually due to the high number of microservices. So, service mesh tools offer sufficient automation for this administrative task. This means that the amount of effort for OPs colleagues approaches zero.
To comply with the OWASP security principle Defense in Depth, communication connections between microservices should be authorized or prevented with firewall rules. This secures communication at the TCP/IP level. For this, Kubernetes provides the concept of network policies. More on this in the following sections.
Typical starting point
Most microservice projects running on Kubernetes start with the following situation (see Figure1: low secure deployment):

Figure1: low secure deployment
For Ingress communication, cloud operators provide suitable components. You can learn how to easily install these components through tutorials. The communication path from the Internet usually goes through a firewall and is routed to the Kubernetes cluster with a load balancer. Cloud providers often provide ready-made solutions for this, which can be easily converted to TLS.
Now begins the part where you have to implement further security measures out of your own responsibility. An Ingress controller in Kubernetes takes care of forwarding the request within the cluster. This is typically equipped as an SSL endpoint with a company’s own certificate. As a result, the requests are forwarded to the respective microservices without TLS after SSL termination. So, communication within the cluster is completely unsecured.
Some microservices (or already all of them?) have security programming that validates the received JWT and performs an authorization check with the claim values it contains. To validate the JWT, requests must be sent (sporadically) to the identity provider (IDP) that issued the JWT. This is usually done with TLS, since the IDP only offers HTTPS access.
The internal cost-benefit analysis shows that a certain level of security has been achieved with the available resources at a reasonable cost. The project team is aware that this setting does not correspond to a zero trust approach, but believes that the effort required for zero trust is far too high. For lack of better knowledge, they are satisfied with this (low) level of security.
Service Mesh
A much higher security level can be achieved with service mesh tools like Istio or Linkerd (and many more). These tools offer corresponding functionalities, which can automate certificate management. We will examine these features in detail using Istio as an example.
Mutual TLS
Each service that becomes part of a service mesh is assigned a sidecar, which controls and monitors incoming and outgoing communication to the service. The sidecar’s behavior is controlled by a central control component that transmits the right information and instructions to the sidecar. The pod consists of the service and the sidecar. When started, the sidecar retrieves an individual SSL certificate from the central control unit. This enables the sidecar to establish a mutual TLS (mTLS) connection. Only the request from the sidecar to the service (communication within the pod) takes place without TLS. After a predefined interval (for Istio, the default is 24 hours), the sidecar is automatically issued a new certificate from the control service. For the next 24 hours, this new certificate is used for the mTLS connection.
With the following Istio rule, mTLS communication becomes mandatory for the entire service mesh:
1 2 3 4 5 6 7 8 | apiVersion: security.istio.io/v1beta1
kind: PeerAuthentication
metadata:
name: default
namespace: istio-system
spec:
mtls:
mode: STRICT
|
For a transitional solution where not all services have been integrated into the service mesh yet, there is a special mode: PERMISSIVE. Services within the service mesh are addressed with mTLS and services running outside the service mesh continue to be called without TLS. This is done automatically and is executed by the sidecar that initiates the call.
The security advantage is obvious. Communication within the service mesh takes place via mTLS and certificate management runs automatically at short intervals. The entire mTLS handling is performed transparently without any intervention in the service’s code, from the service’s point of view. Protection on the application layer of the network stack can be combined with the protection on layers 3 and 4 without issue (see the following sections).
Ingress Gateway
Istio offers Ingress Gateway, which controls the entry point into the Kubernetes cluster and into the service mesh. It can completely replace the Ingress Controller from the previous system landscape (see Figure1: low secure deployment).
You could also run Istio without the Ingress Gateway, but you will lose a lot of functionality. The advantage of using the Ingress Gateway is that all Istio rules apply. So, all rules for traffic routing, security, releasing, etc. are applicable. Communication from the Ingress gateway to the first service is already secured with mTLS. In the case of an alternative Ingress Controller, this request would not have SSL protection. The name Gateway (instead of Controller) was deliberately chosen by Istio, because it can be operated as an API Gateway with Ingress Gateway’s existing functionality.
For secure entry into the cluster, the Ingress Gateway can be configured with the appropriate company certificate, much like the procedure for an Ingress Controller. The following Istio rule defines how the Ingress Gateway works:
1 2 3 4 5 6 7 8 9 10 11 12 13 14 15 16 17 18 19 20 21 22 23 24 25 26 27 28 29 30 31 32 33 | apiVersion: networking.istio.io/v1alpha3
kind: Gateway
metadata:
name: mygateway
spec:
selector:
istio: ingressgateway
servers:
- port:
number: 443
name: https
protocol: HTTPS
tls:
mode: SIMPLE
credentialName: mytls-credential
hosts:
- myapp.mycompany.de
|
An SSL port (443) is opened for all requests to the host name myapp.mycompany.de and the appropriate SSL certificate is read from the Kubernetes Secret mytls-credential. The SSL secret is created with the following Kubernetes rule:
1 2 3 4 5 6 7 8 9 10 11 12 13 14 15 16 17 18 19 | apiVersion: v1
kind: Secret
metadata:
name: mytls-credential
type: kubernetes.io/tls
data:
tls.crt: |
XYZ...
tls.key: |
ABc...
|
The input to the cluster is also secured with TLS and further communication is done with Istio’s mTLS setting.
Network Policy
After the HTTP layer is secured with SSL, further network layers (OSI Layer 3 and 4) should now be secured. The concept of Network Policy establishes something like firewalls in Kubernetes. These policies define the network connections between pods and enforces compliance by a previously installed network plugin. Network policies without a network plugin have no effect. Kubernetes offers a wide range of plugins that can be installed in a Kubernetes cluster.
The best practice is to define a Deny-All rule. This disallows network communication between pods throughout the cluster. The following Deny-All-Ingress rule prohibits all incoming communication on pods in the associated namespace:
1 2 3 4 5 6 7 8 9 10 11 12 13 14 15 16 17 | apiVersion: networking.k8s.io/v1
kind: NetworkPolicy
metadata:
name: default-deny-ingress
namespace: my-namespace
spec:
podSelector: {}
policyTypes:
- Ingress
|
After this rule has been enabled, you can enable specific Ingress connections individually. For example, the following rule enables Ingress traffic to the pod with the label app=myapp, but only if the request comes from the Ingress gateway:
1 2 3 4 5 6 7 8 9 10 11 12 13 14 15 16 17 18 19 20 21 22 23 24 25 26 27 | apiVersion: networking.k8s.io/v1
kind: NetworkPolicy
metadata:
name: access-myapp
namespace: my-namespace
spec:
podSelector:
matchLabels:
app: myapp
ingress:
- from:
- podSelector:
matchLabels:
istio: ingressgateway
|
For each additional connection that is allowed, the rule must either be extended or more rules must be defined.
By establishing the aforementioned rules, the initial deployment (see Figure1: low secure deployment) has changed into the following (see Figure 2: medium secure deployment):
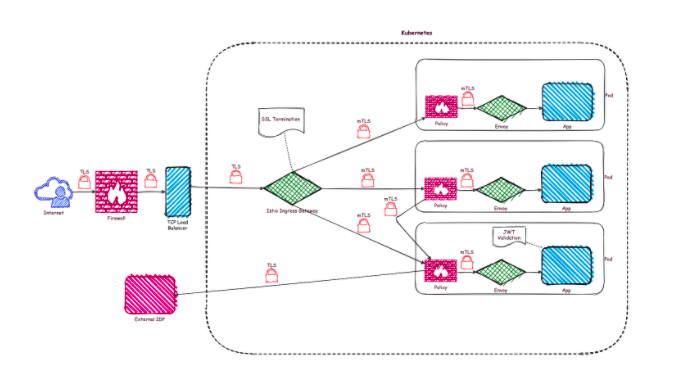
Figure 2: medium secure deployment
SSL termination is performed by the Istio Ingress Gateway. Each forwarded request is secured with mTLS. Additionally, a network policy defines the intended Ingress request for each pod. All unwanted requests are prevented by the network plugin. This is a big step towards zero trust. But we are still missing authorization checks, which limit the permissibility of calls even further.
Authentication (AuthN) and Authorization (AuthZ)
For AuthN and AuthZ, Istio provides a set of rules that can be used to granularly control which calls are authorized and which are not. These rules are obeyed by sidecars and the Ingress gateway, which means that the entire defined rule set is applied everywhere in the service mesh. The corresponding application does not notice this, since it is handled transparently by the respective sidecars.
Authentication is based on a JSON web token verified by Istio. For this, the necessary JWT validations are executed, and the issuing identity provider (IDP) is accessed. After successful validation, the request is effectively authenticated within the entire service mesh. This is best done in the Ingress Gateway, so that the check is performed as soon as it enters the service mesh or cluster.
The following rule instructs Istio to validate the received JWT against the IDP with the URL https://idp.mycompany.de/.well-known/jwks.json:
1 2 3 4 5 6 7 8 9 10 11 12 13 14 15 16 17 18 19 20 21 22 23 | apiVersion: security.istio.io/v1beta1
kind: RequestAuthentication
metadata:
name: ingress-idp
namespace: istio-system
spec:
selector:
matchLabels:
istio: ingressgateway
jwtRules:
- issuer: "my-issuer"
|
As you can see from the rule above, the issuers are to be defined as an array, and several different IDPs can also be specified.
This means that the request is considered authenticated, but no authorization checks are performed. These must be specified separately with a different rule type. As with Network Policy, there is a best practice when declaring all accesses in the service mesh as unauthorized. You can define this with the following rule:
1 2 3 4 5 6 7 8 9 10 11 12 13 | apiVersion: security.istio.io/v1beta1
kind: AuthorizationPolicy
metadata:
name: allow-nothing
namespace: istio-system
spec:
{}
|
As we saw earlier with Network Policy, each individual access to a precisely specified pod can be controlled in a very fine, granular way. Within the rule, the from, to, and when sections can be used to define where the request must come from, which HTTP methods and endpoints should be called, and which authentication content (claims in JWT) must be included. Access will only be allowed (action: allow) when these criteria are met:
1 2 3 4 5 6 7 8 9 10 11 12 13 14 15 16 17 18 19 20 21 22 23 24 25 26 27 28 29 30 31 32 33 34 35 36 37 38 39 40 41 42 43 44 45 46 47 48 49 50 51 | apiVersion: security.istio.io/v1beta1
kind: AuthorizationPolicy
metadata:
name: my-app
namespace: my-namespace
spec:
selector:
matchLabels:
app: my-app
action: ALLOW
rules:
- from:
- source:
principals: ["cluster.local/ns/ns-xyz/sa/my-partner-app"]
- source:
namespaces: ["ns-abc", “ns-def”]
to:
- operation:
methods: ["GET"]
paths: ["/info*"]
- operation:
methods: ["POST"]
paths: ["/data"]
when:
- key: request.auth.claims[iss]
|
In addition to the possibility of authorizing a request with action: allow, you can also deny certain requests (action: deny) or integrate your own authorization checks into the service mesh with action: custom. This allows you to continue using existing authorization systems, which already exist in many companies.
Final system
The following zero trust infrastructure results after applying all of the rules (see Figure 3: secure deployment):
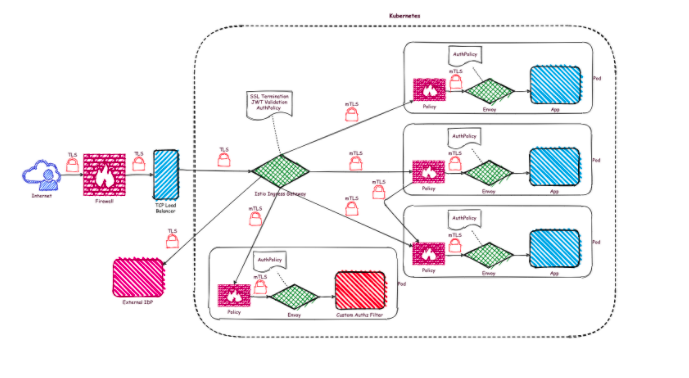
Figure 3: secure deployment
Along with communication secured with TLS, authorization checks have now been added. These are evaluated in each of the sidecars. The JWT sent in the HTTP header serves as the basis for authentication.
To achieve this final state, the following rules are necessary (see Table 1: Overview rules):
Table 1: Overview rules
| Function | Rules |
| TLS termination | Gateway-Rule and Kubernetes-Secret |
| mTLS | PeerAuthentication |
| Network Segmentation | Network-Policy (Deny-Ingress) and one Network-Policy per pod |
| Authentication | RequestAuthentication |
| Authorization | AuthorizationPolicy (Allow-Noting) and one AuthorizationPolicy per pod |
In total, there are only six basic rules and two additional rules per pod for access control. With this small number of rules, you should come to a different conclusion about the effort-benefit analysis for a zero-trust infrastructure.
Conclusion
Admittedly, the effort to establish a service mesh tool in a project is not exactly small. But in addition to all the security aspects, these tools offer much more functionality. This can be a great service when operating microservices. From a purely security-focused point of view, the cost of a service mesh tool is relatively high. But in combination with other service mesh functionalities such as traffic routing, resilience, and releasing, the cost-benefit analysis is positive. Furthermore, automated certificate management is not trivial. A self-implemented solution might not be completely error-free. When it comes to security you should not allow any mistakes.
It can be combined with the Network Policy and established in parallel without influencing Istio. This corresponds to a Defense in Depth approach.
Authorization checks can be finely controlled and leave nothing to be desired. However, caution is advised, since the large amount of options can lead to complex, difficult-to-understand situations. Always consider Keep it Simple, Stupid (KISS).
In order to establish a Defense in Depth approach for authorization checks, you should perform an authorization check in your respective applications.
When it comes to auditing, currently Istio only supports Stackdriver. A larger selection of audit systems would be preferable, but this can still come in the future.
Overall, with a few Kubernetes or Istio rules, a zero trust infrastructure can be established that will likely stand up to any security audit.


